
A Box of Creative Possibilities
Sometimes an experiment starts with a question.
Sometimes it starts with a material you’ve never used before.
And sometimes it starts when you bring a box of art supplies to a room full of creative people and everyone immediately wants to play.
Recently, I reached out to Sculpey while exploring materials and creative possibilities for The Materials Lab.
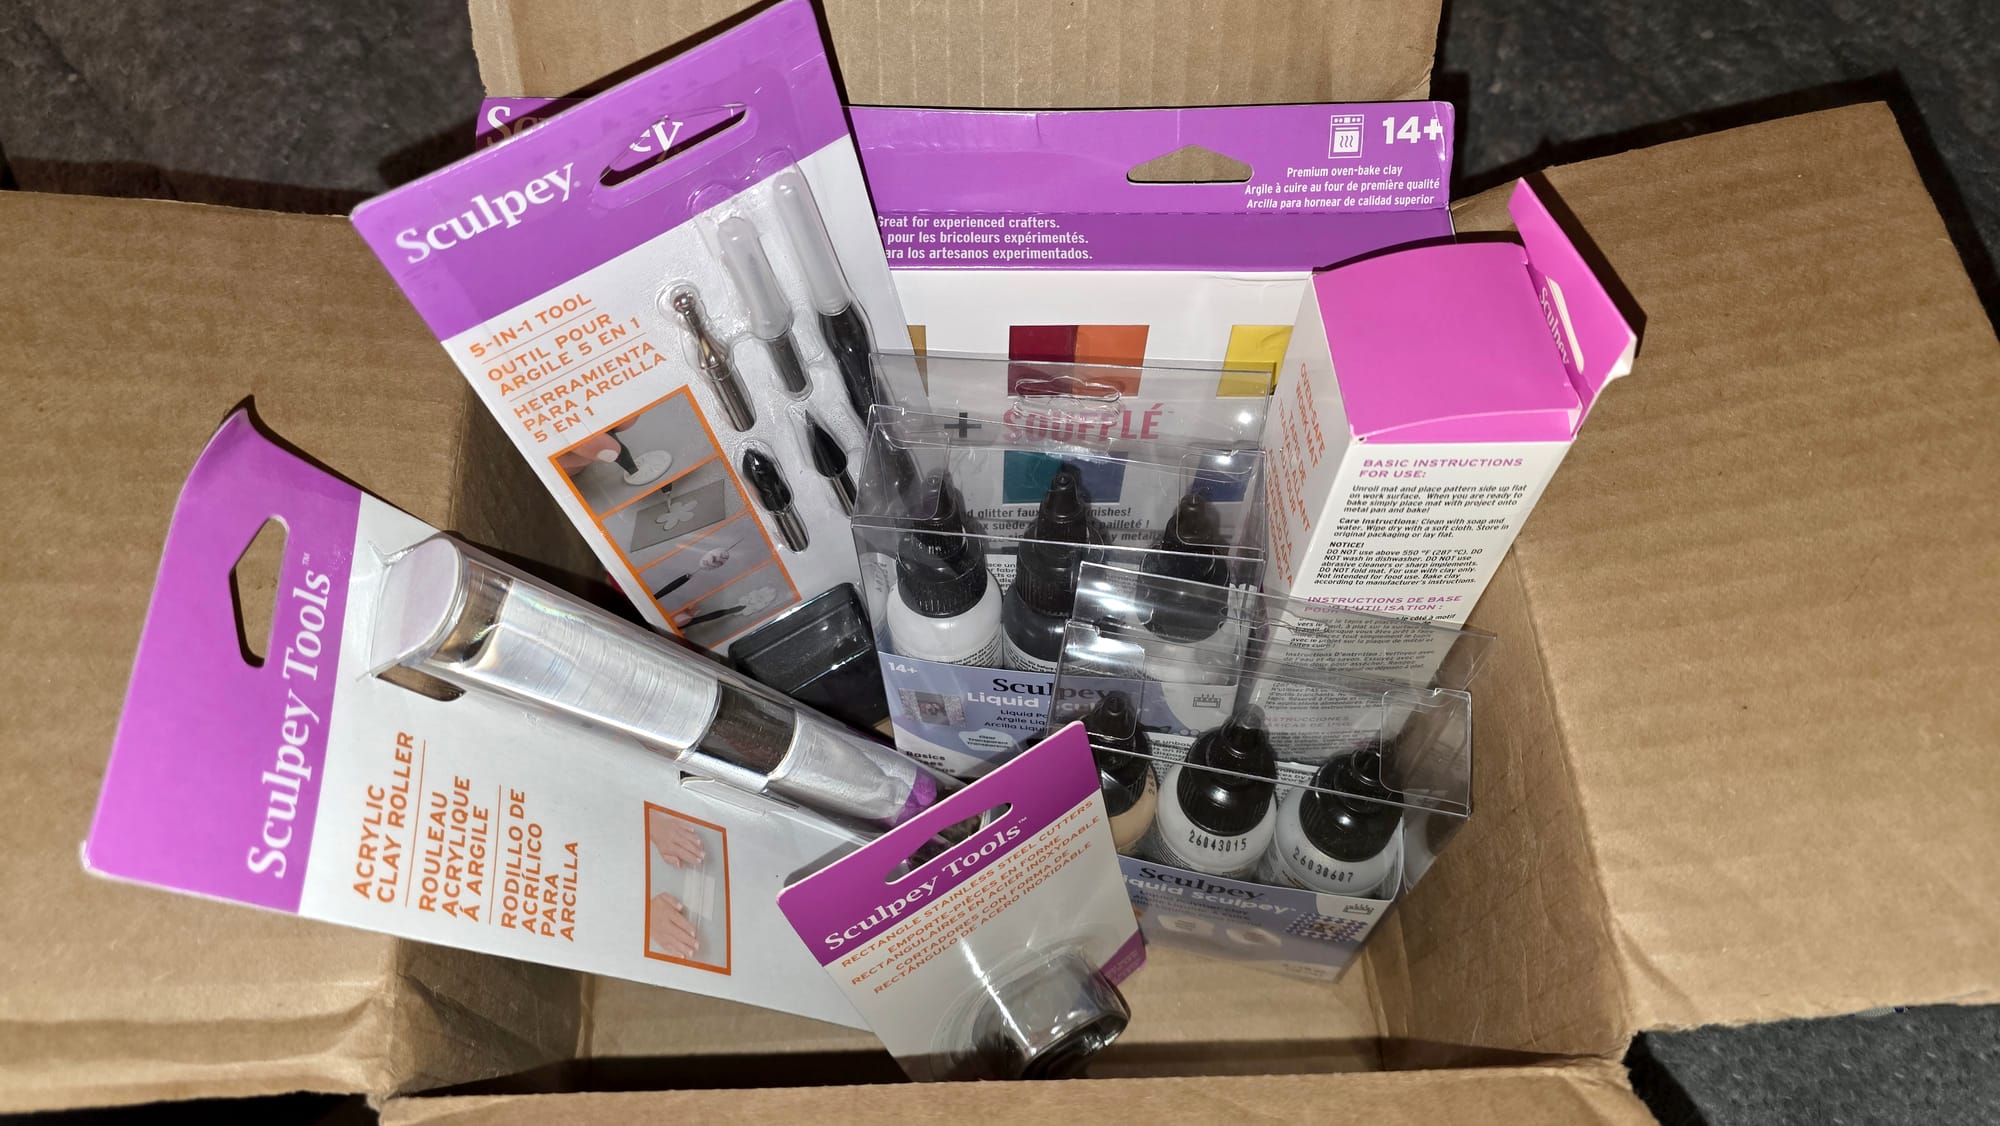
Jennifer from Sculpey generously offered to send me some materials to experiment with, and when the package arrived, I was honestly surprised by just how much there was to explore.
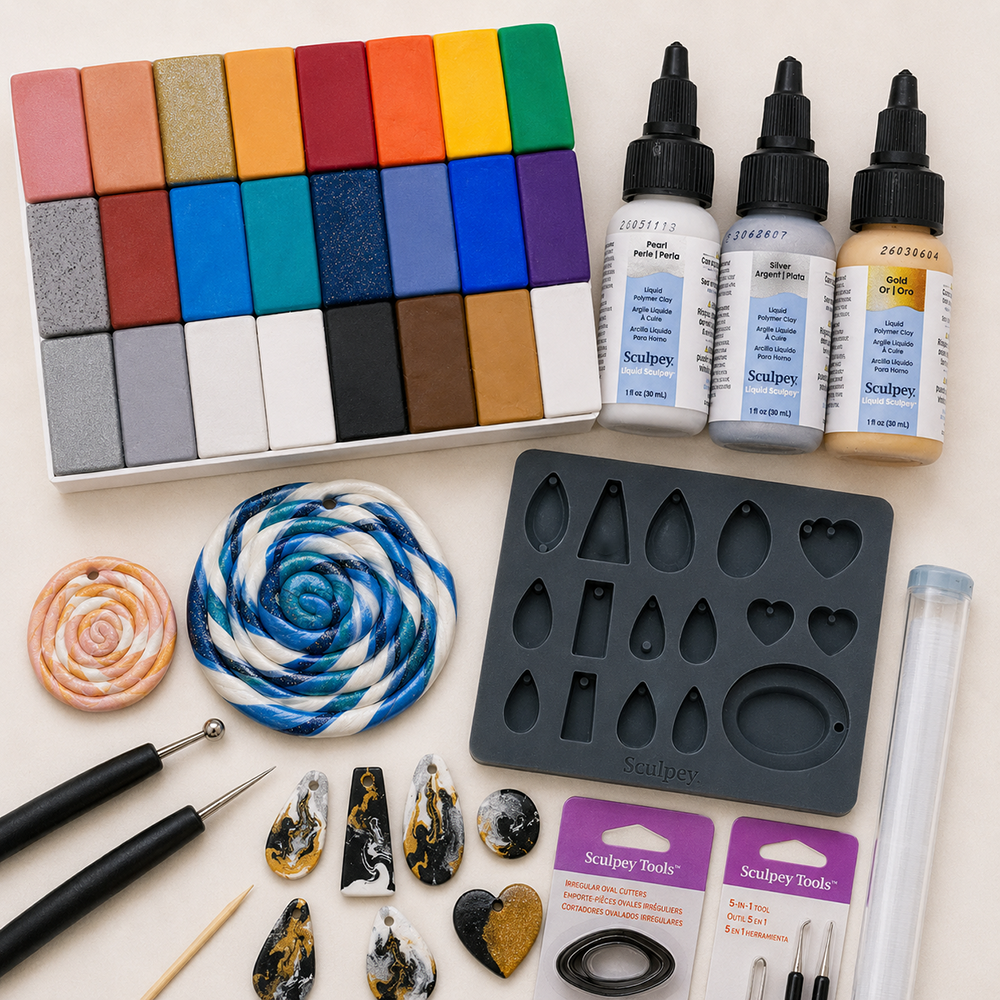
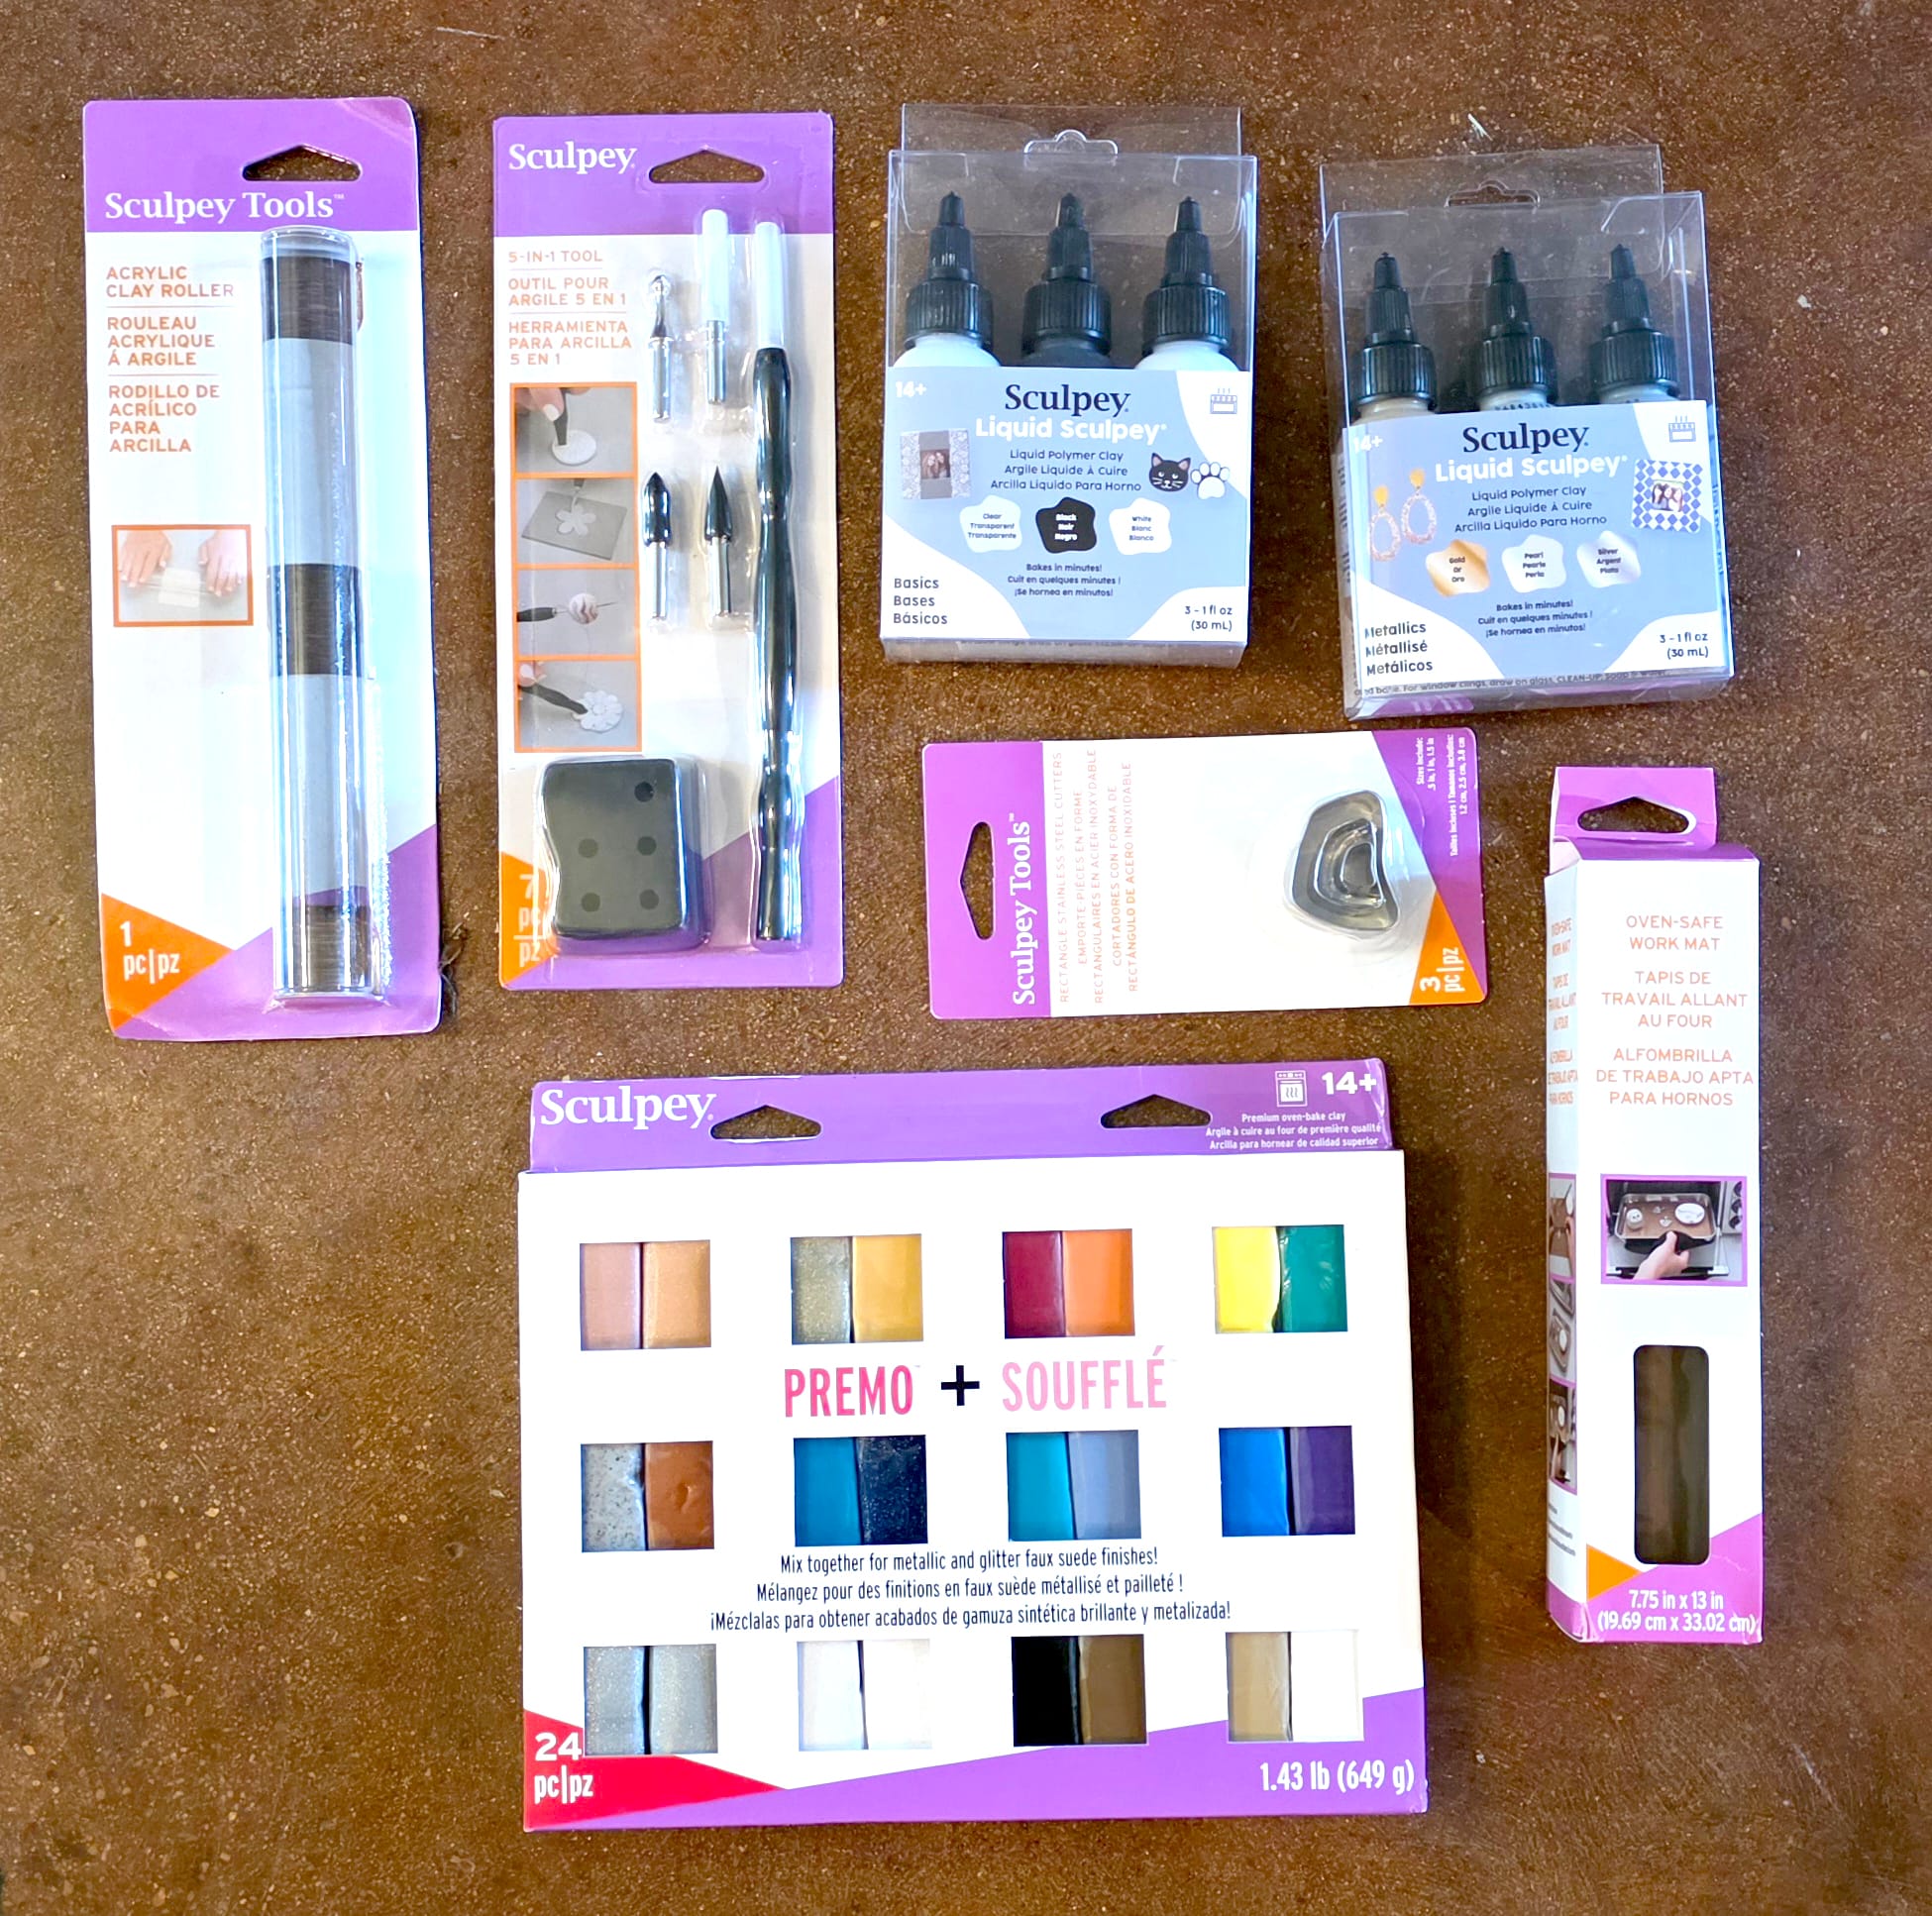
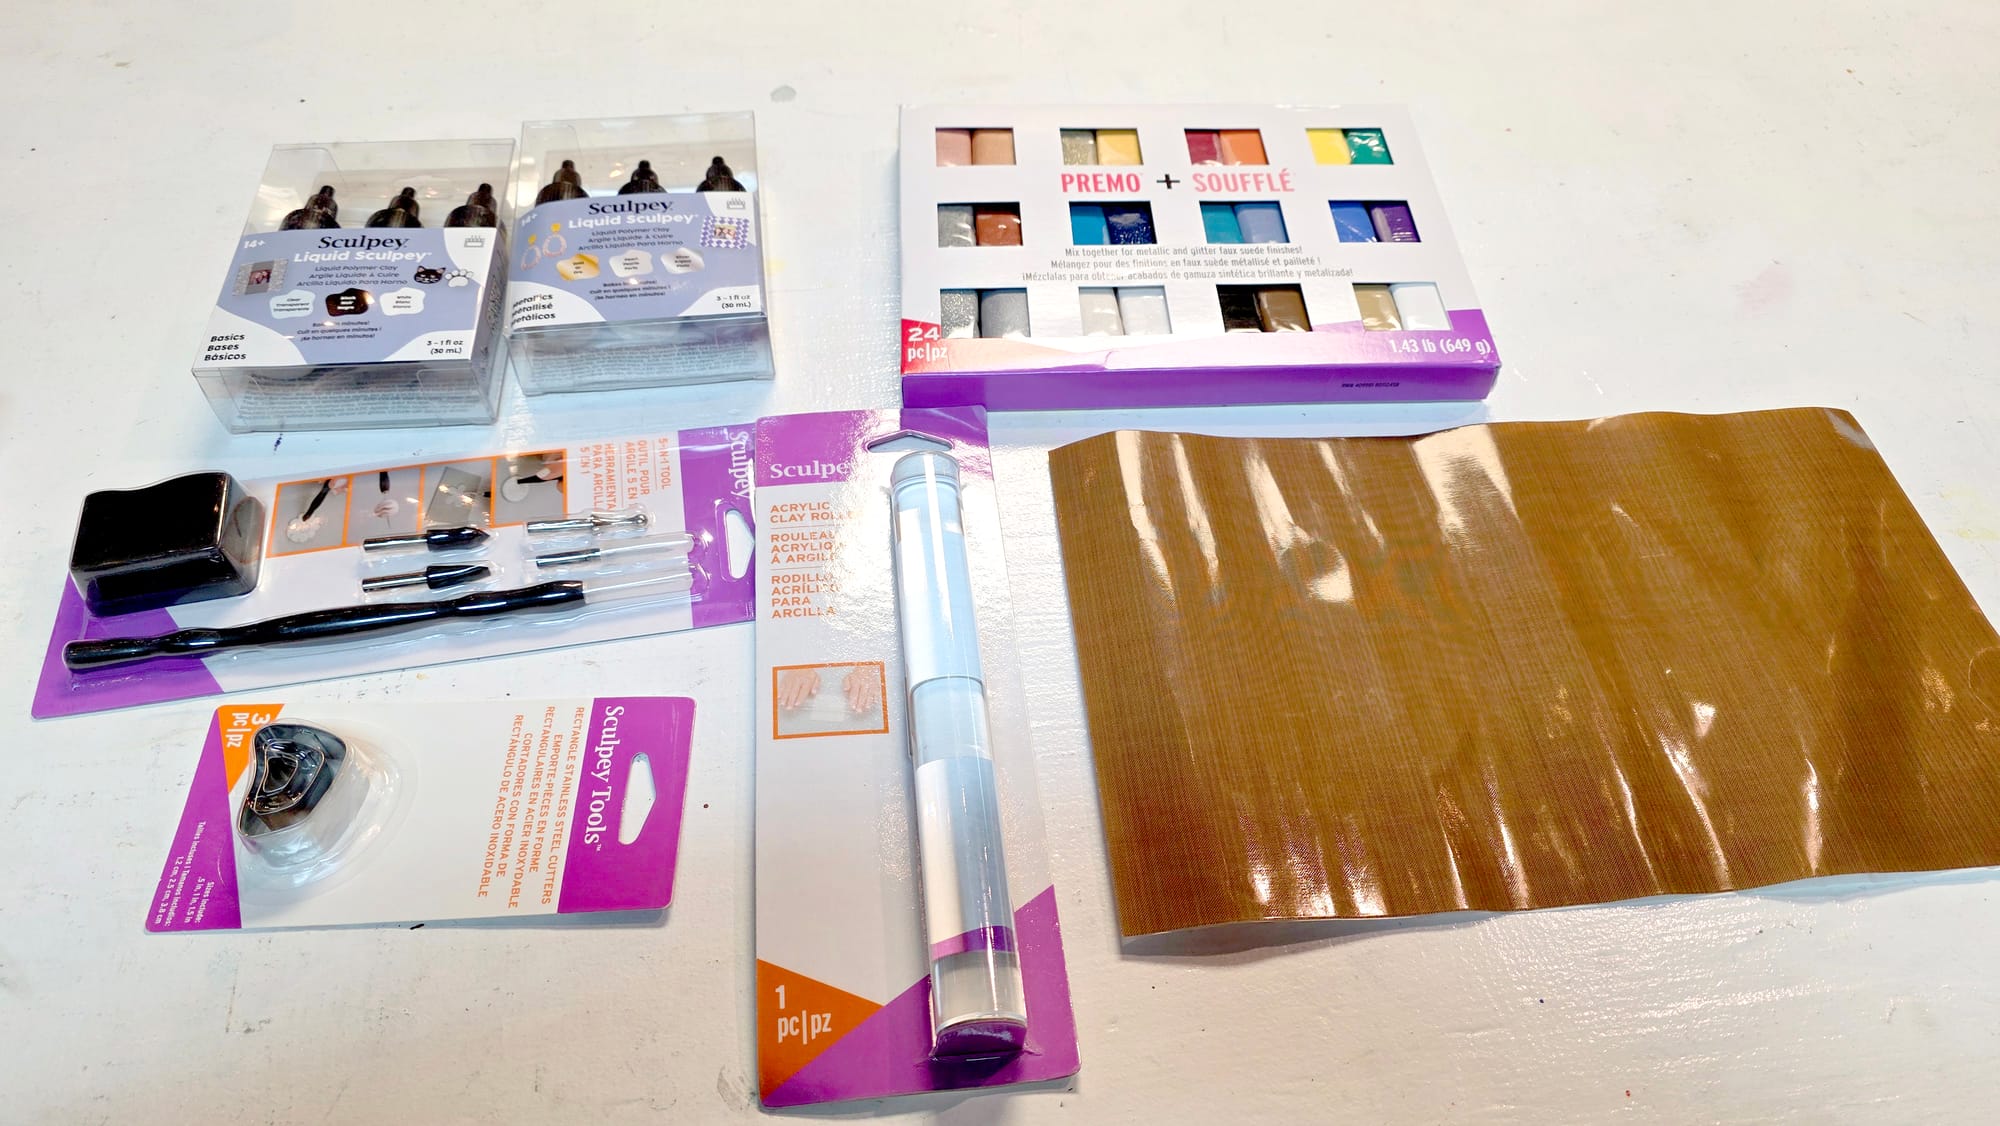
Sculpey gifted me a 24-piece Premo™ and Soufflé™ polymer clay multi-pack, Liquid Sculpey® in both Basics and Metallics, a 5-in-1 clay tool, an oven-safe work mat, an acrylic clay roller, and a set of irregular oval cutters.
A huge thank-you to Jennifer and Sculpey for providing these materials and giving me the opportunity to experiment with them.
Rather than wait until I knew exactly what I was doing, I packed everything up and brought it with me to art club.
That turned out to be a very good decision.
Almost immediately, people gathered around to see what I'd received.
One member who has made a lot of polymer clay jewelry was especially excited about the Premo and Soufflé clay.
She showed us photos of some of the beautiful jewelry she'd created and explained more about the materials than I knew going into the experiment.
But Liquid Sculpey created perhaps the biggest curiosity of the night.
Our art club host already owned Sculpey molds designed for Liquid Sculpey—but she'd never actually used Liquid Sculpey in them.
Now I happened to have several bottles of it sitting on the table.
Another member had experience with Liquid Sculpey but was surprised to see us pouring it into molds because she'd never used it that way before.
Suddenly, everyone had a different piece of knowledge to contribute.
We started filling jewelry molds, combining colors, swirling metallics with neutrals, seeing what happened when they were baked, and comparing the results.
Then we started experimenting with the solid polymer clay, too.
Not everything came out perfectly—and I'm glad it didn't.
There was overflow.
Some edges will need cleaning up.
Some color combinations were more interesting from one side than the other.
And even within two small batches of molded pieces, I started changing how I worked as I saw what the material was actually doing.
That's exactly what The Materials Lab is for.
This isn't meant to be a definitive guide to everything you can do with Sculpey.
I'm learning as I go, alongside other artists who have their own experiences, questions, and ideas to contribute.
In fact, everyone was excited enough about the experiment that they encouraged me to bring the Sculpey supplies back to another art club so we can keep going.
So this particular Materials Lab isn't finished.
It's just beginning.
 Jessica Carey
Materials Lab Notes
Material: Oven-bake polymer clay and liquid polymer clay
Brand: Sculpey
Experiment: Jewelry components, molds, marbling, color mixing, sculpting, shaping—and whatever else we discover along the way
Setting: Art club + independent experiments
Experience level: Mixed, from first-time Liquid Sculpey experimentation to previous polymer-clay jewelry experience
Status: Experiment ongoing
What I'm Working With
Sculpey generously provided the materials for this experiment, including:
- Sculpey Premo™ & Soufflé™ Multi-Pack, 24 pc — a mixture of Premo and Soufflé polymer clays in different colors and finishes
- Liquid Sculpey® Multi-Pack – Basics — liquid polymer clay in basic colors
- Liquid Sculpey® Multi-Pack – Metallics — metallic liquid polymer clay
- Sculpey Tools™ 5-in-1 Clay Tool — a multipurpose tool for shaping, smoothing, cutting and detailing clay
- Sculpey Tools™ Oven-Safe Work Mat — a reusable work surface that can go directly into the oven
- Sculpey Tools™ 8-Inch Acrylic Clay Roller — for rolling and flattening polymer clay
- Sculpey Tools™ Irregular Oval Cutters — cutters for creating organic oval shapes
The Liquid Sculpey molds we used during our first art-club experiment belonged to the art-club host rather than being part of the materials Sculpey sent me.
One thing I'm already discovering is just how many directions this collection can go.
Sculpey describes Premo and Soufflé as suitable for jewelry, sculpture, mixed media and other artistic applications, while Liquid Sculpey can be used for things including jewelry, lettering, window clings and even mosaic grout.
For now, we're starting with jewelry-making, molds, color mixing and marbling—but I'm deliberately leaving the rest open-ended.
After all, the question behind The Materials Lab isn't just: "What is this supposed to do?" It's: "What else can it do?"
Disclosure: Sculpey generously provided the polymer clay, Liquid Sculpey, and tools featured in this Materials Lab experiment at no cost. The experiments, observations, and opinions shared here are my own.
First Impressions: Everyone Had Something to Contribute
One of the first things I noticed wasn't actually about the clay itself.
It was how quickly a box of unfamiliar materials became a conversation.
Something I love about making art around other creative people is that you rarely have to know everything yourself.
As soon as I pulled out the Sculpey supplies at art club, people were curious.
Packages started getting passed around the table.
People asked questions.
Someone would recognize something and explain what they knew, which would lead someone else to ask another question.
One member had considerably more experience with polymer clay than I did and had made a lot of polymer clay jewelry.
She was surprised by what Sculpey had sent me and particularly excited about the Premo and Soufflé clay.
She explained that I'd been given some of Sculpey's higher-end clay and showed us photos of pieces she'd made herself—which immediately gave me even more ideas about what these little blocks of clay might eventually become.
Her excitement also made me appreciate the materials differently.
I knew Sculpey had generously sent me a substantial collection to experiment with, but I didn't yet understand all of the differences between the kinds of clay in the box.
According to Sculpey, Premo is designed to remain flexible and strong after curing while still being firm enough to hold fine details, making it useful for jewelry and more advanced techniques.
Soufflé is lightweight, strong, flexible and capable of holding detail, with a suede-like finish after baking.
But the most interesting first impression may have come from the Liquid Sculpey.
Our art club host already had a silicone mold filled with shapes for making pendants and other jewelry components.
The funny part?
She'd never actually used Liquid Sculpey before.
I had the Liquid Sculpey.
She had the molds.
Someone else at the table had experience with Liquid Sculpey—but was surprised when we started putting it into molds because she'd never used it that way.
So, between all of us, we had the materials, the tools, some experience and a whole lot of curiosity.
And that was enough.
Nobody at the table needed to be the expert.
One person knew something another person didn't.
Someone had a tool someone else had never used.
Someone asked a question that made the rest of us curious.
We could compare what we knew, try something, see what happened and learn from the result.
That's when looking through a box of unfamiliar materials turned into an actual experiment.
Experiment #1: What Happens When You Pour Liquid Sculpey Into a Mold?
Our first real experiment of the night started with something none of us at the table had actually done before: pouring Liquid Sculpey into jewelry molds.
We had several colors from the Basics and Metallics sets, along with the molds our art club host already owned.
Rather than trying to make everything perfectly uniform, we decided to play with the colors.
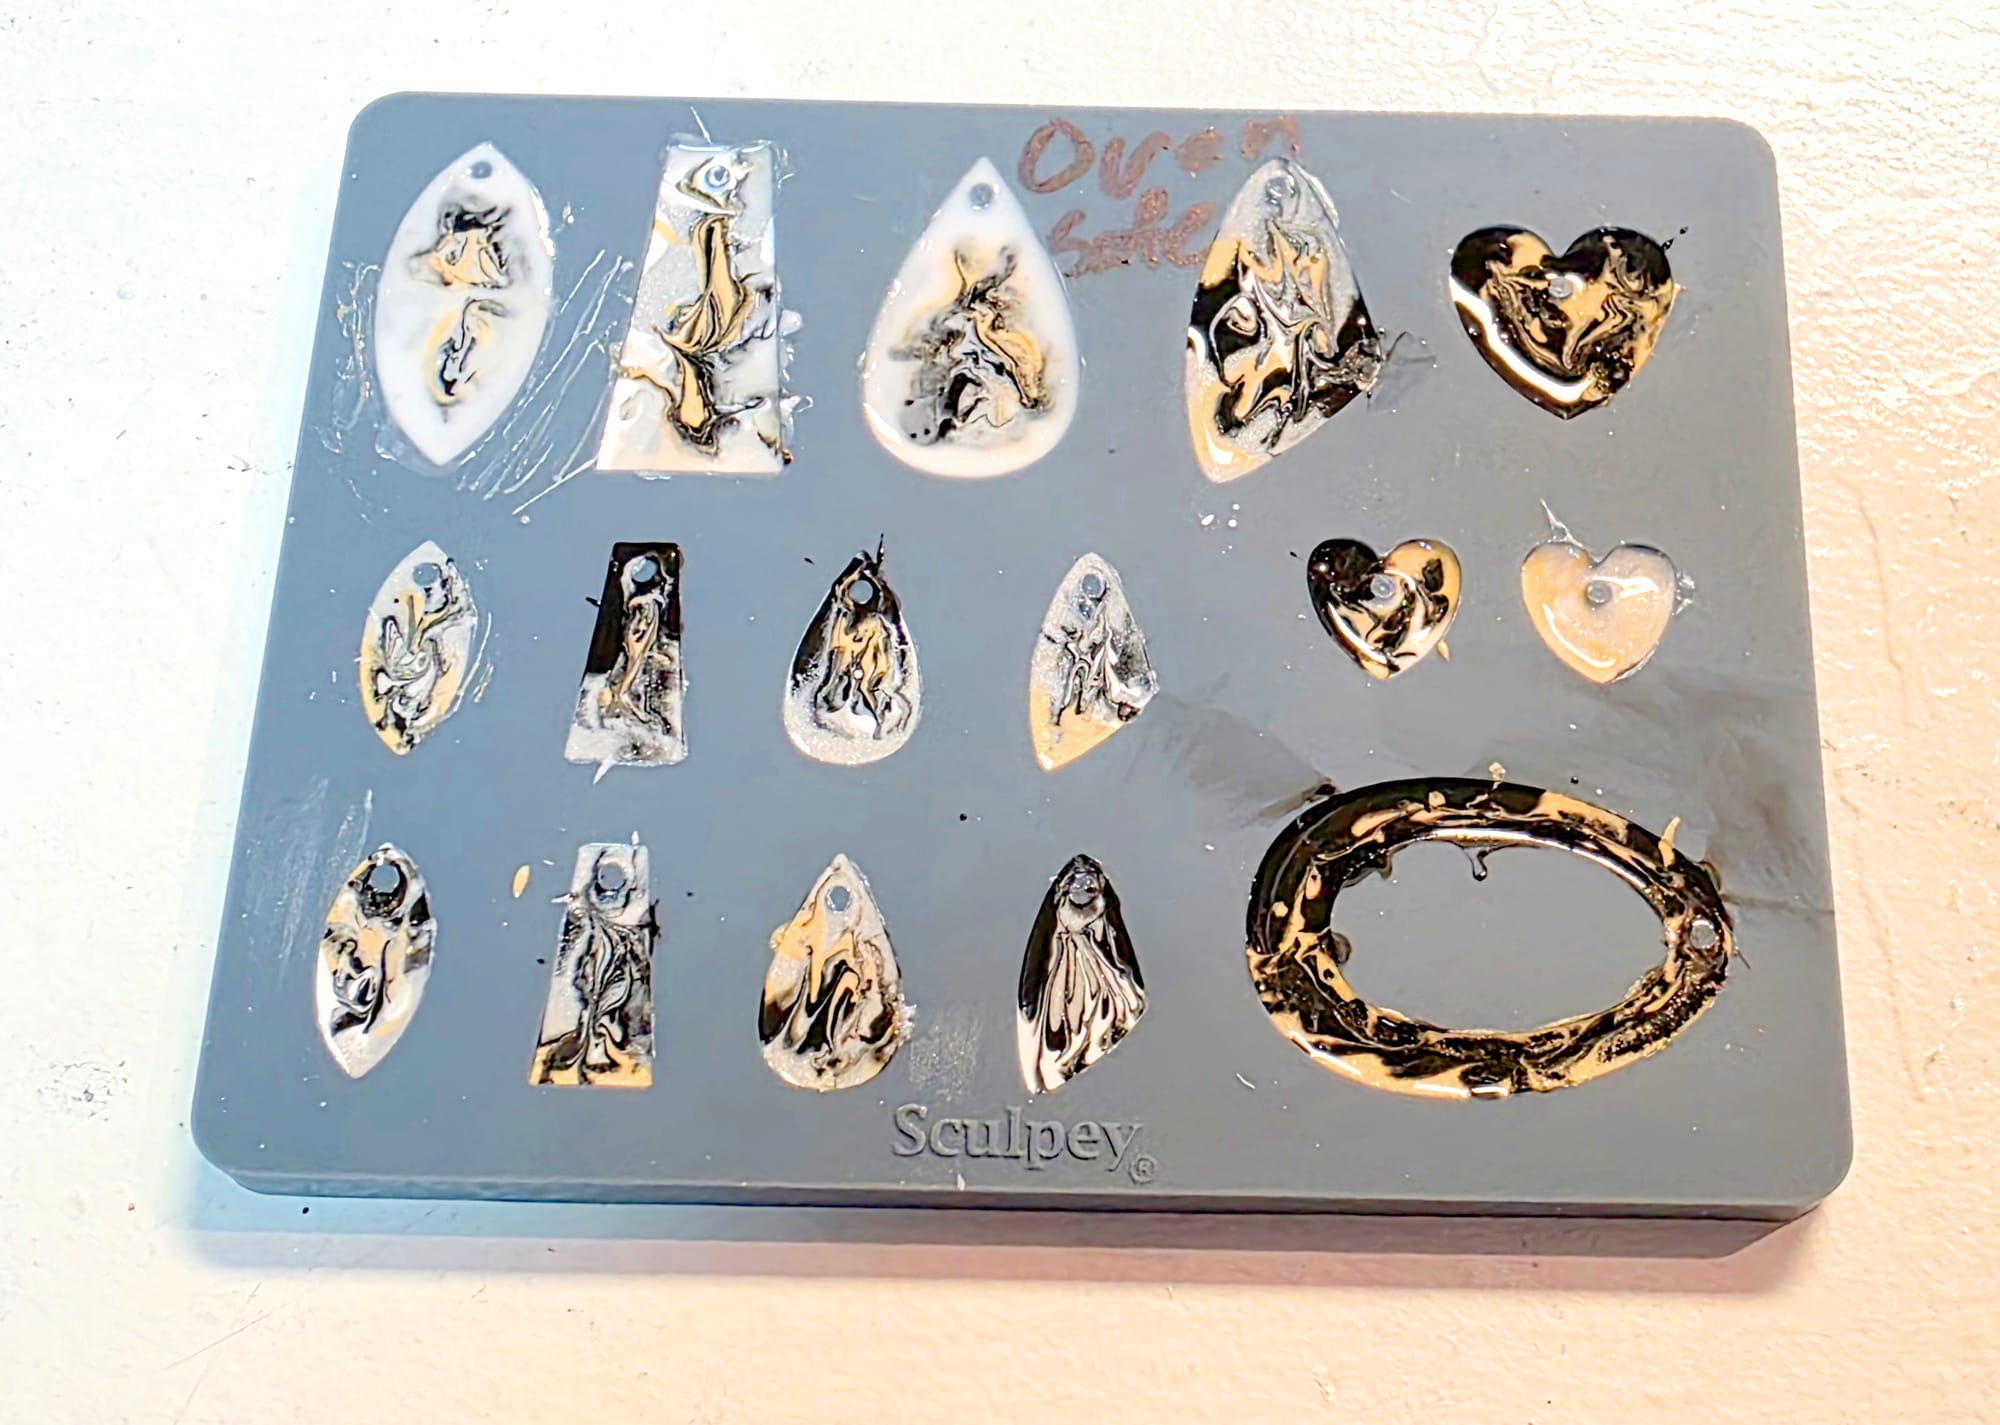
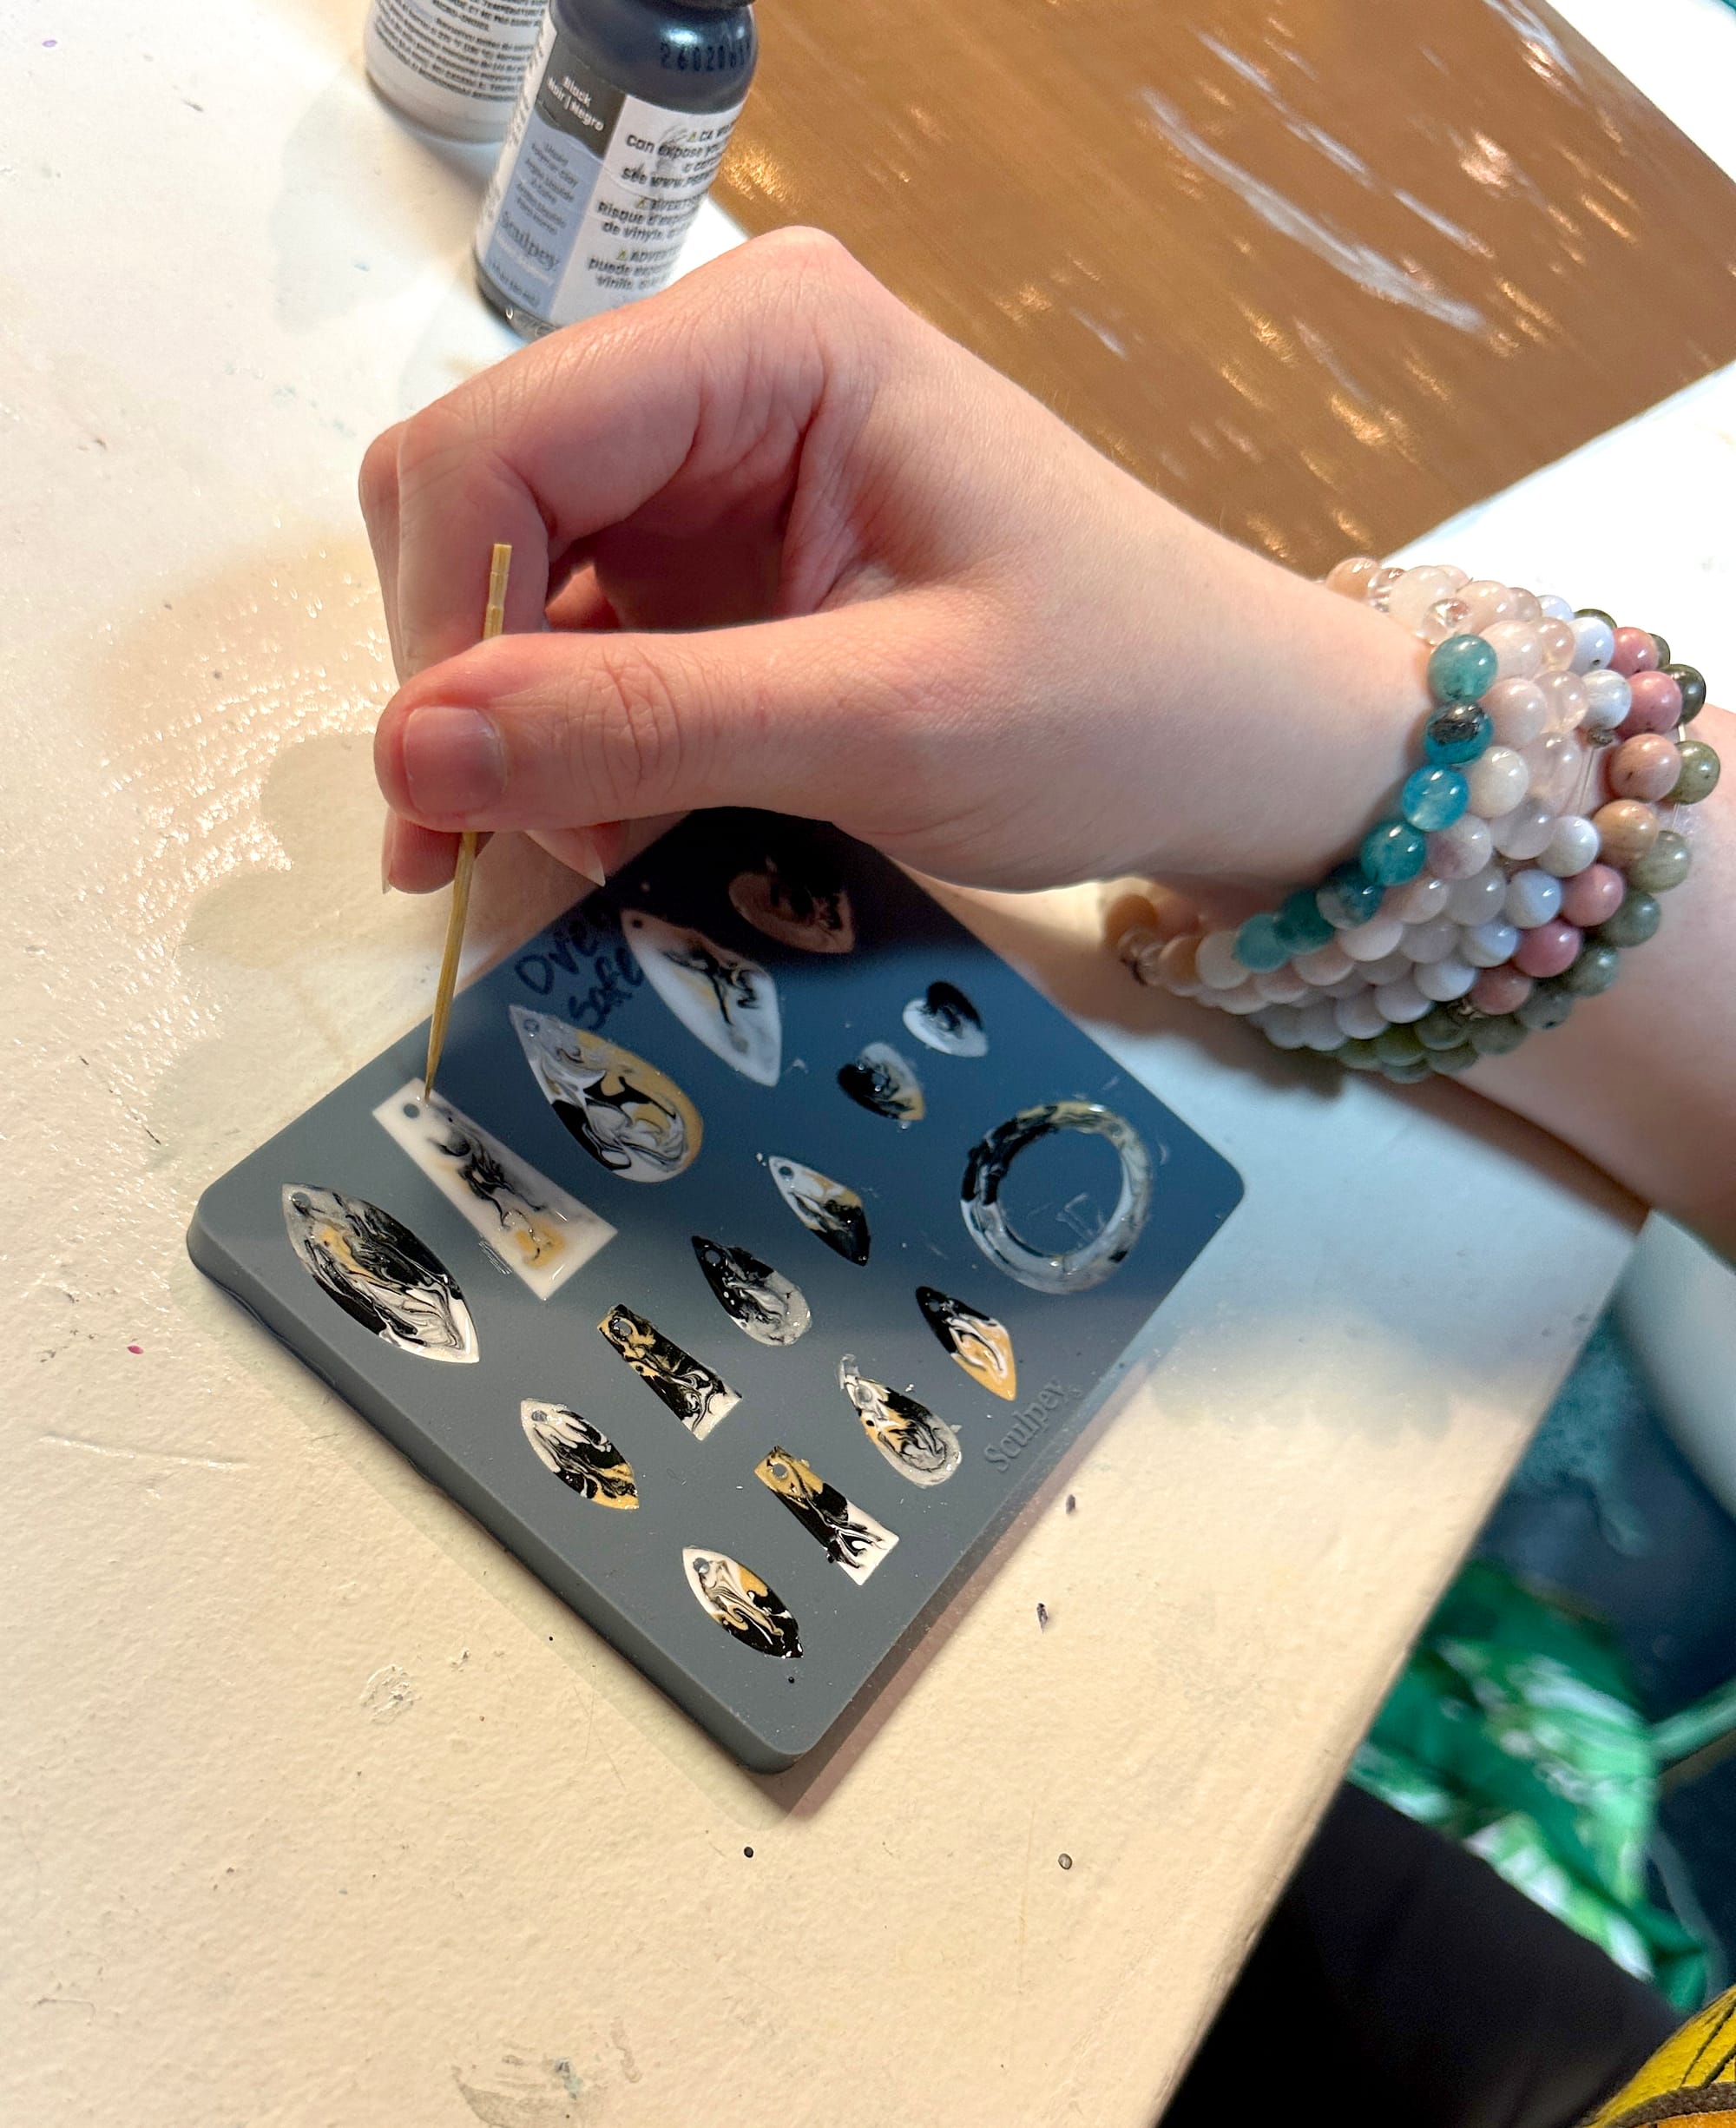
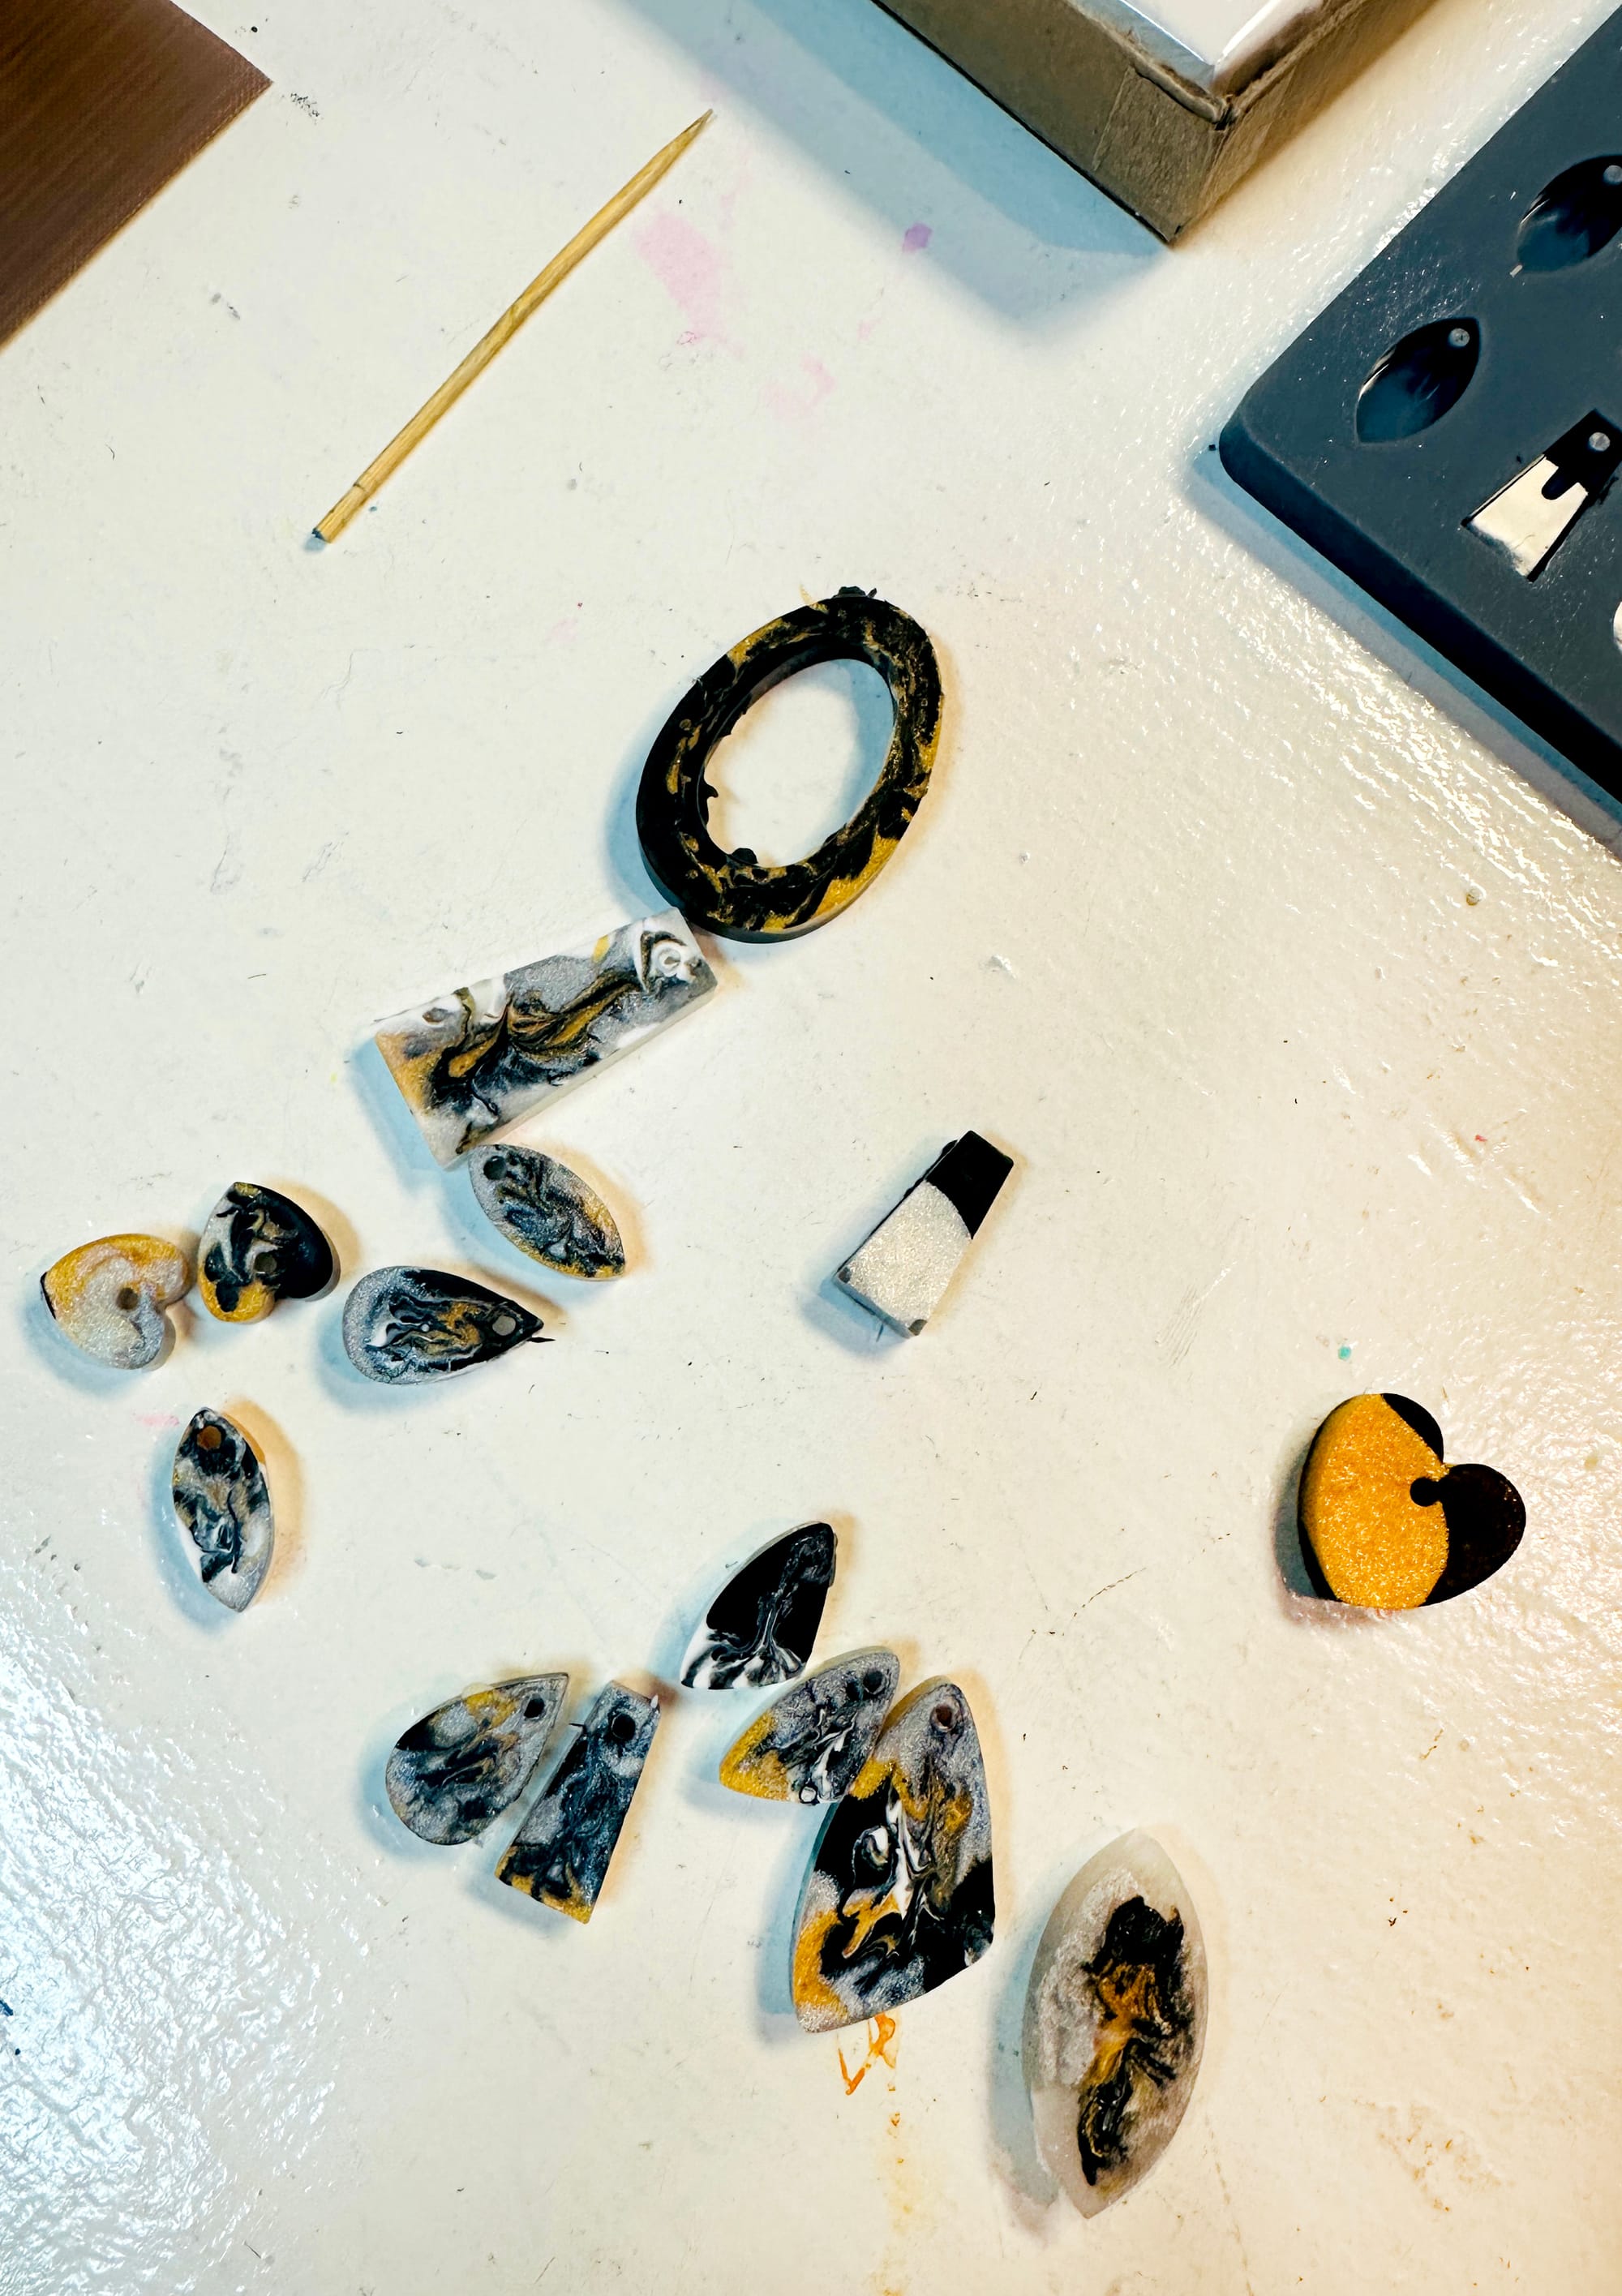
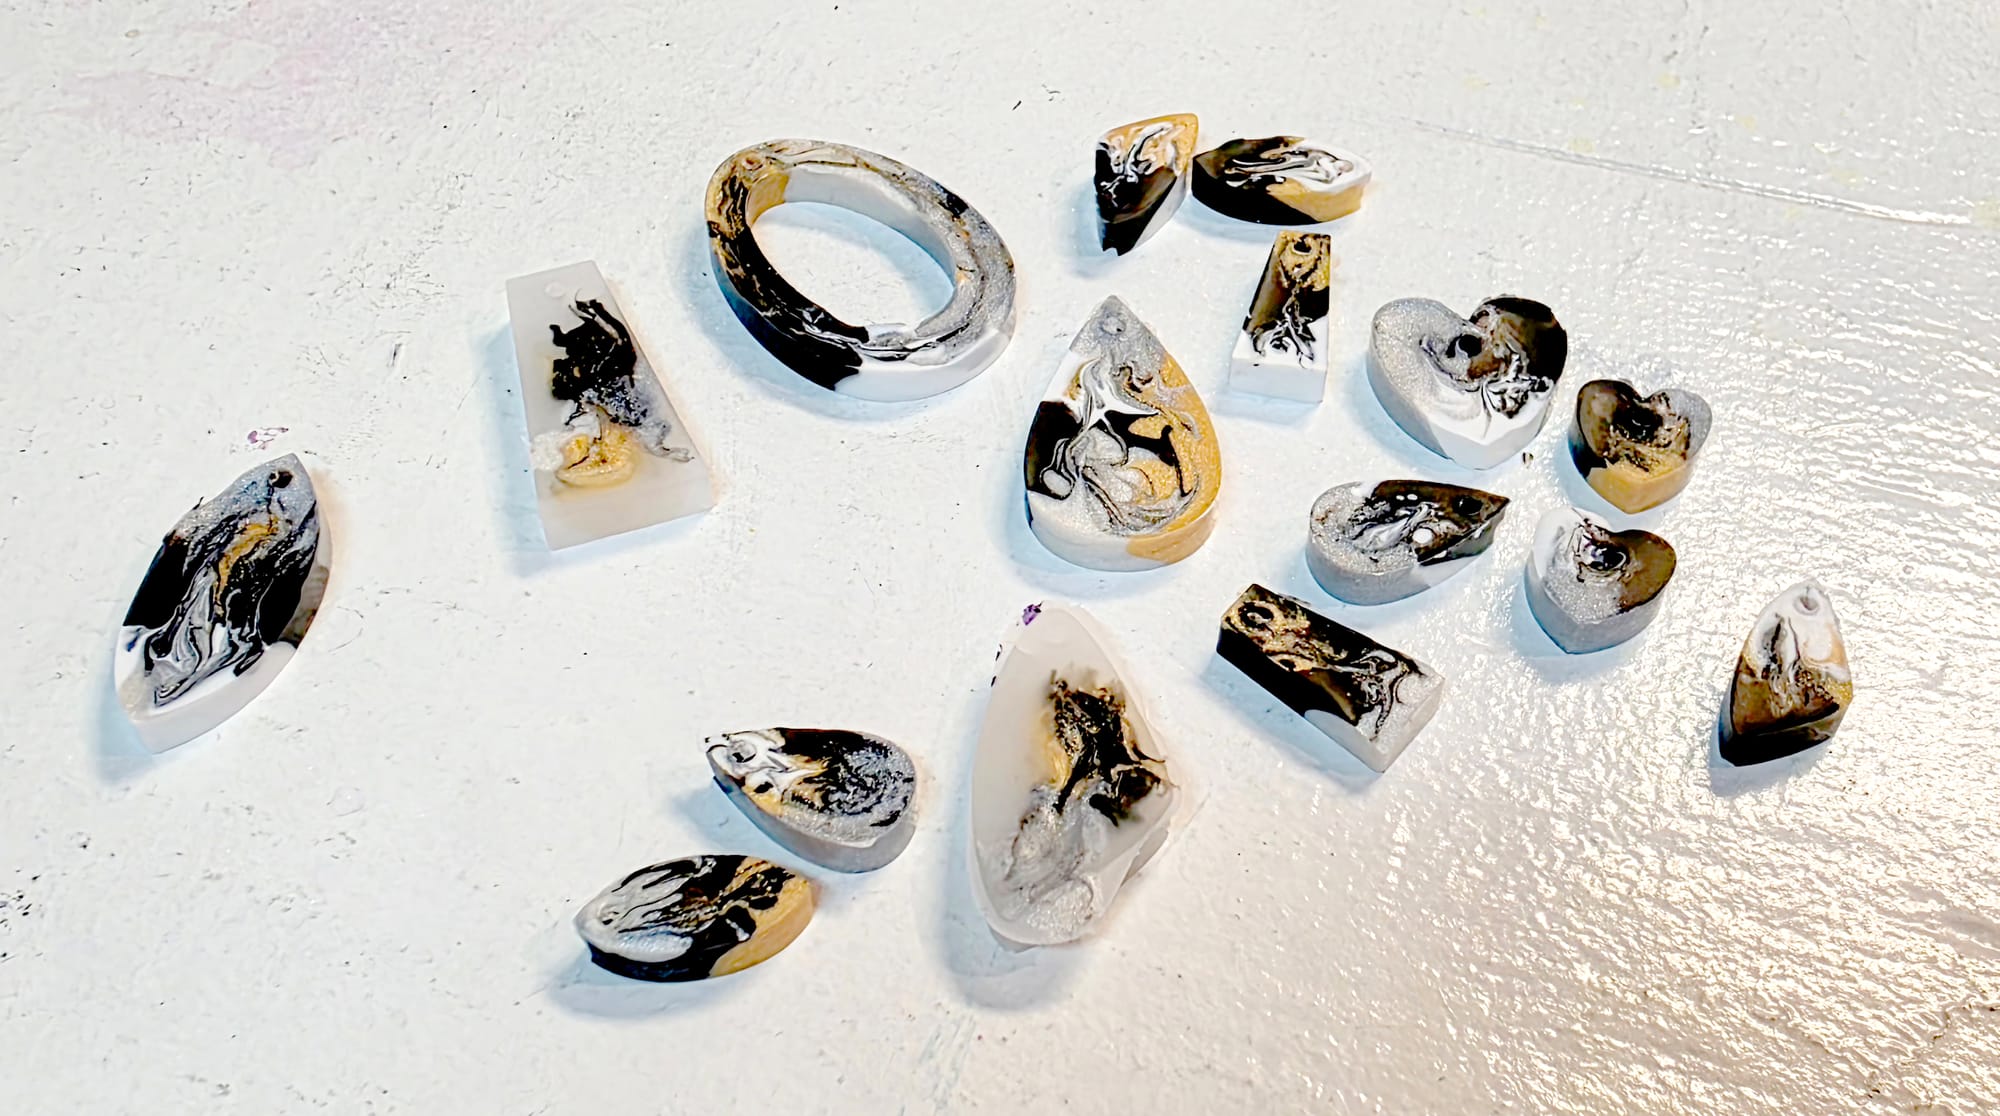
I poured small amounts of different Liquid Sculpey colors into the individual shapes, combining black, white, gold, silver and other metallic tones.
Then, using a small pointed tool, I gently dragged the colors through one another to create swirls and marbled patterns.
There wasn't really a precise formula.
A little of this color. A little of that one. Swirl them together. See what happens.
And that turned out to be part of the fun.
Some combinations became dramatically black and gold.
Others developed softer white, silver and metallic swirls.
Even pieces made from the same colors came out completely different because of where the colors were placed and how much they were disturbed.
Learning How Much Is Too Much
One of the first challenges was figuring out how much Liquid Sculpey the tiny molds actually needed.
I tried hard not to overfill them.
I still overfilled some of them.
Because Liquid Sculpey is, well, liquid, a tiny amount can make the difference between filling a mold and creeping over its edge.
Some of my finished pieces consequently have thin bits of cured clay extending beyond the shape they're supposed to have.
That's something I'll approach differently next time.
Sculpey's instructions recommend filling molds only to level and removing excess before baking.
They also suggest gently tapping a filled mold against the work surface to help release trapped air bubbles.
For some mold designs, excess Liquid Sculpey can be scraped or squeegeed away before it ever reaches the oven.
For the pieces I've already made, I'm going to experiment with cleaning up those rough edges rather than considering them ruined. Sculpey itself recommends trimming small protruding bits of cured Liquid Sculpey with small, sharp scissors in some of its projects.
That's one of the things I want this Materials Lab to document: making something imperfect doesn't necessarily mean starting over. Sometimes the next experiment is figuring out how to finish it.
The Front Looked Great, But What About the Back?
The marbling taught me something else I hadn't really considered beforehand.
I was concentrating on what I could see through the open top of the mold.
That's where I carefully swirled the colors.
Naturally, that's where a lot of the interesting movement happened.
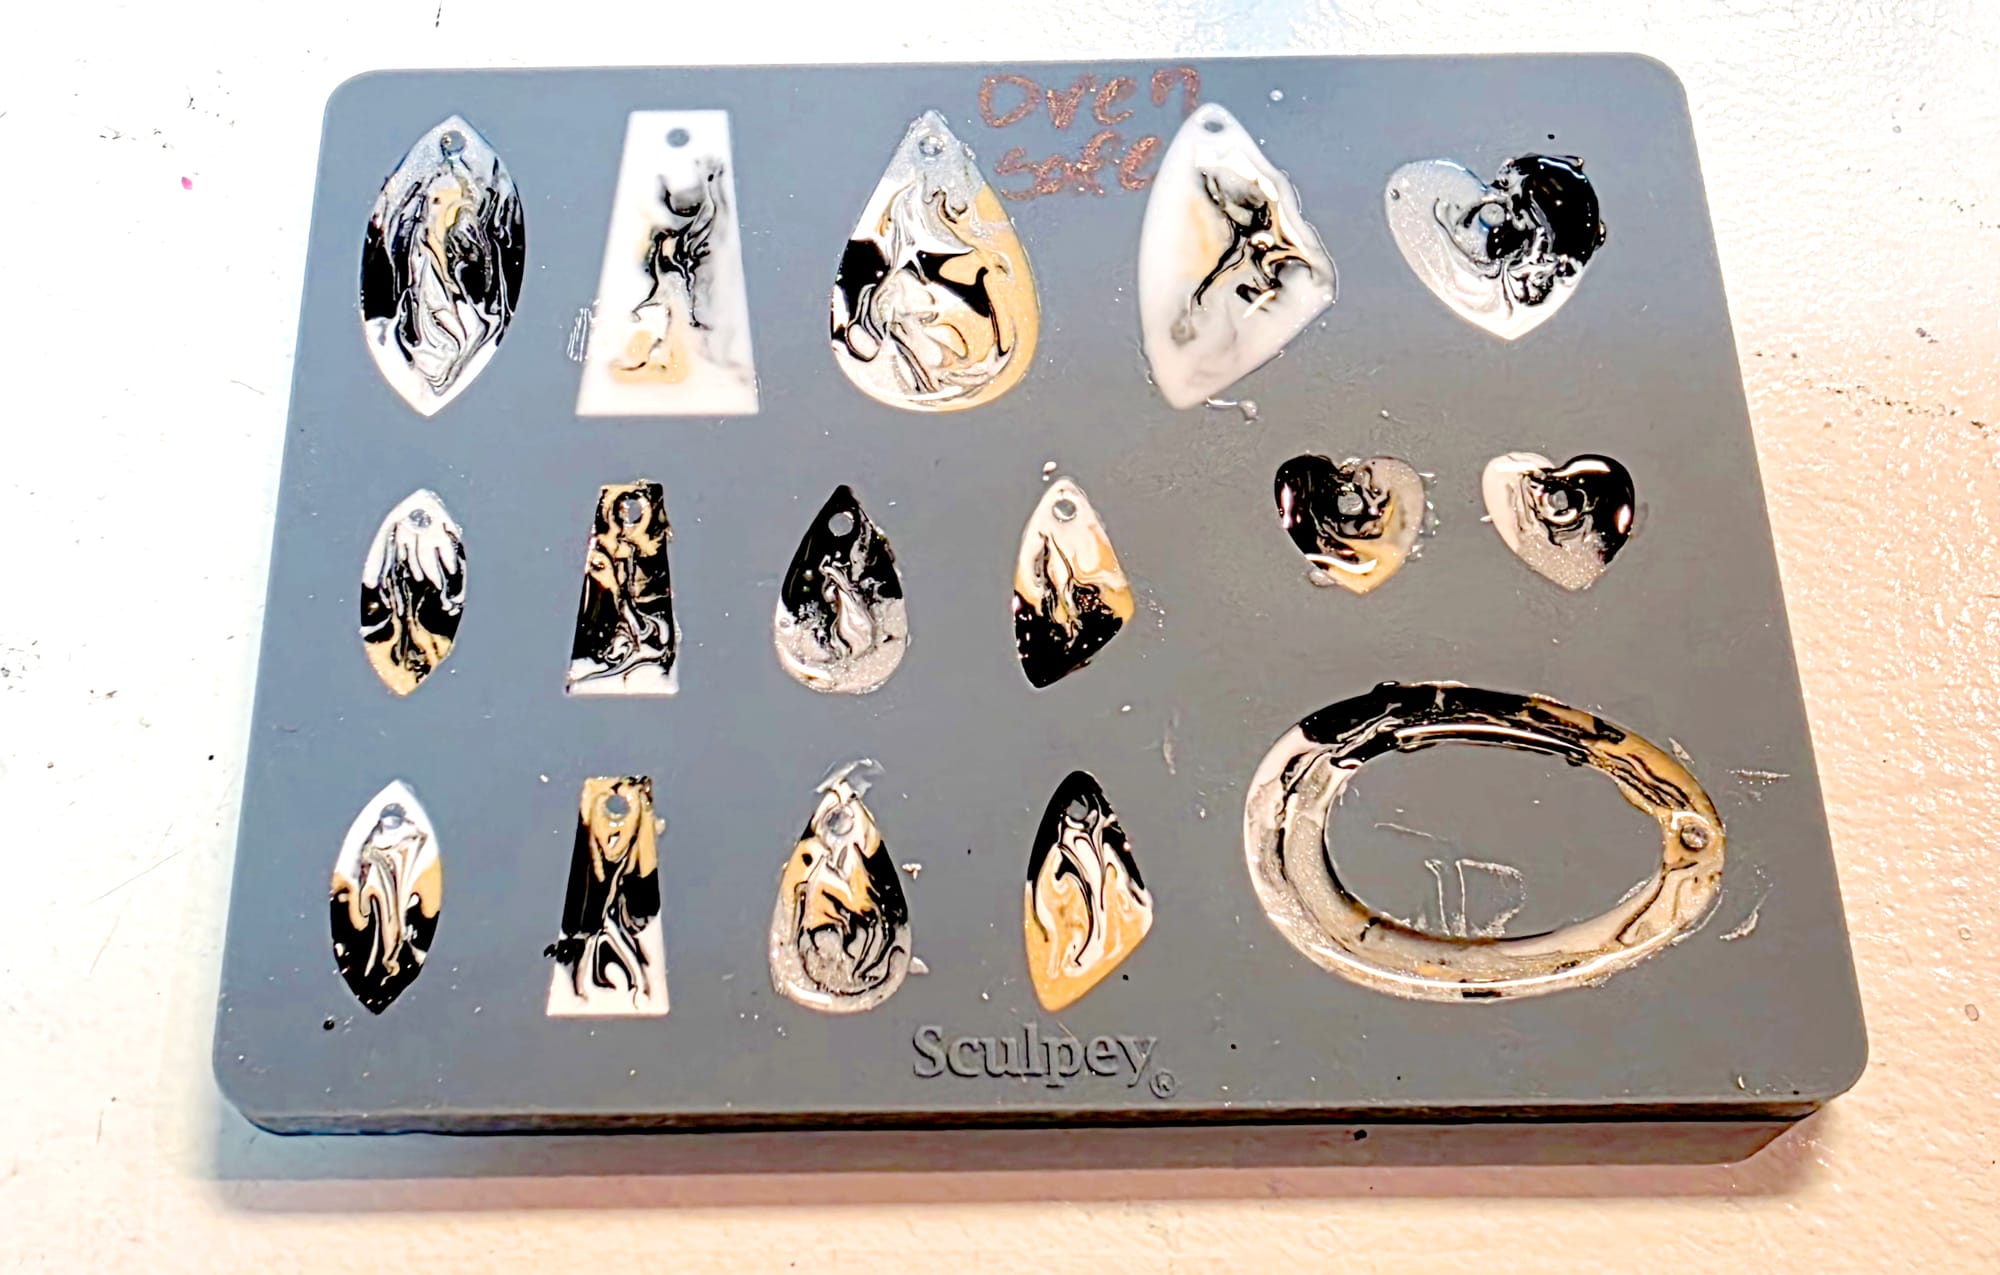
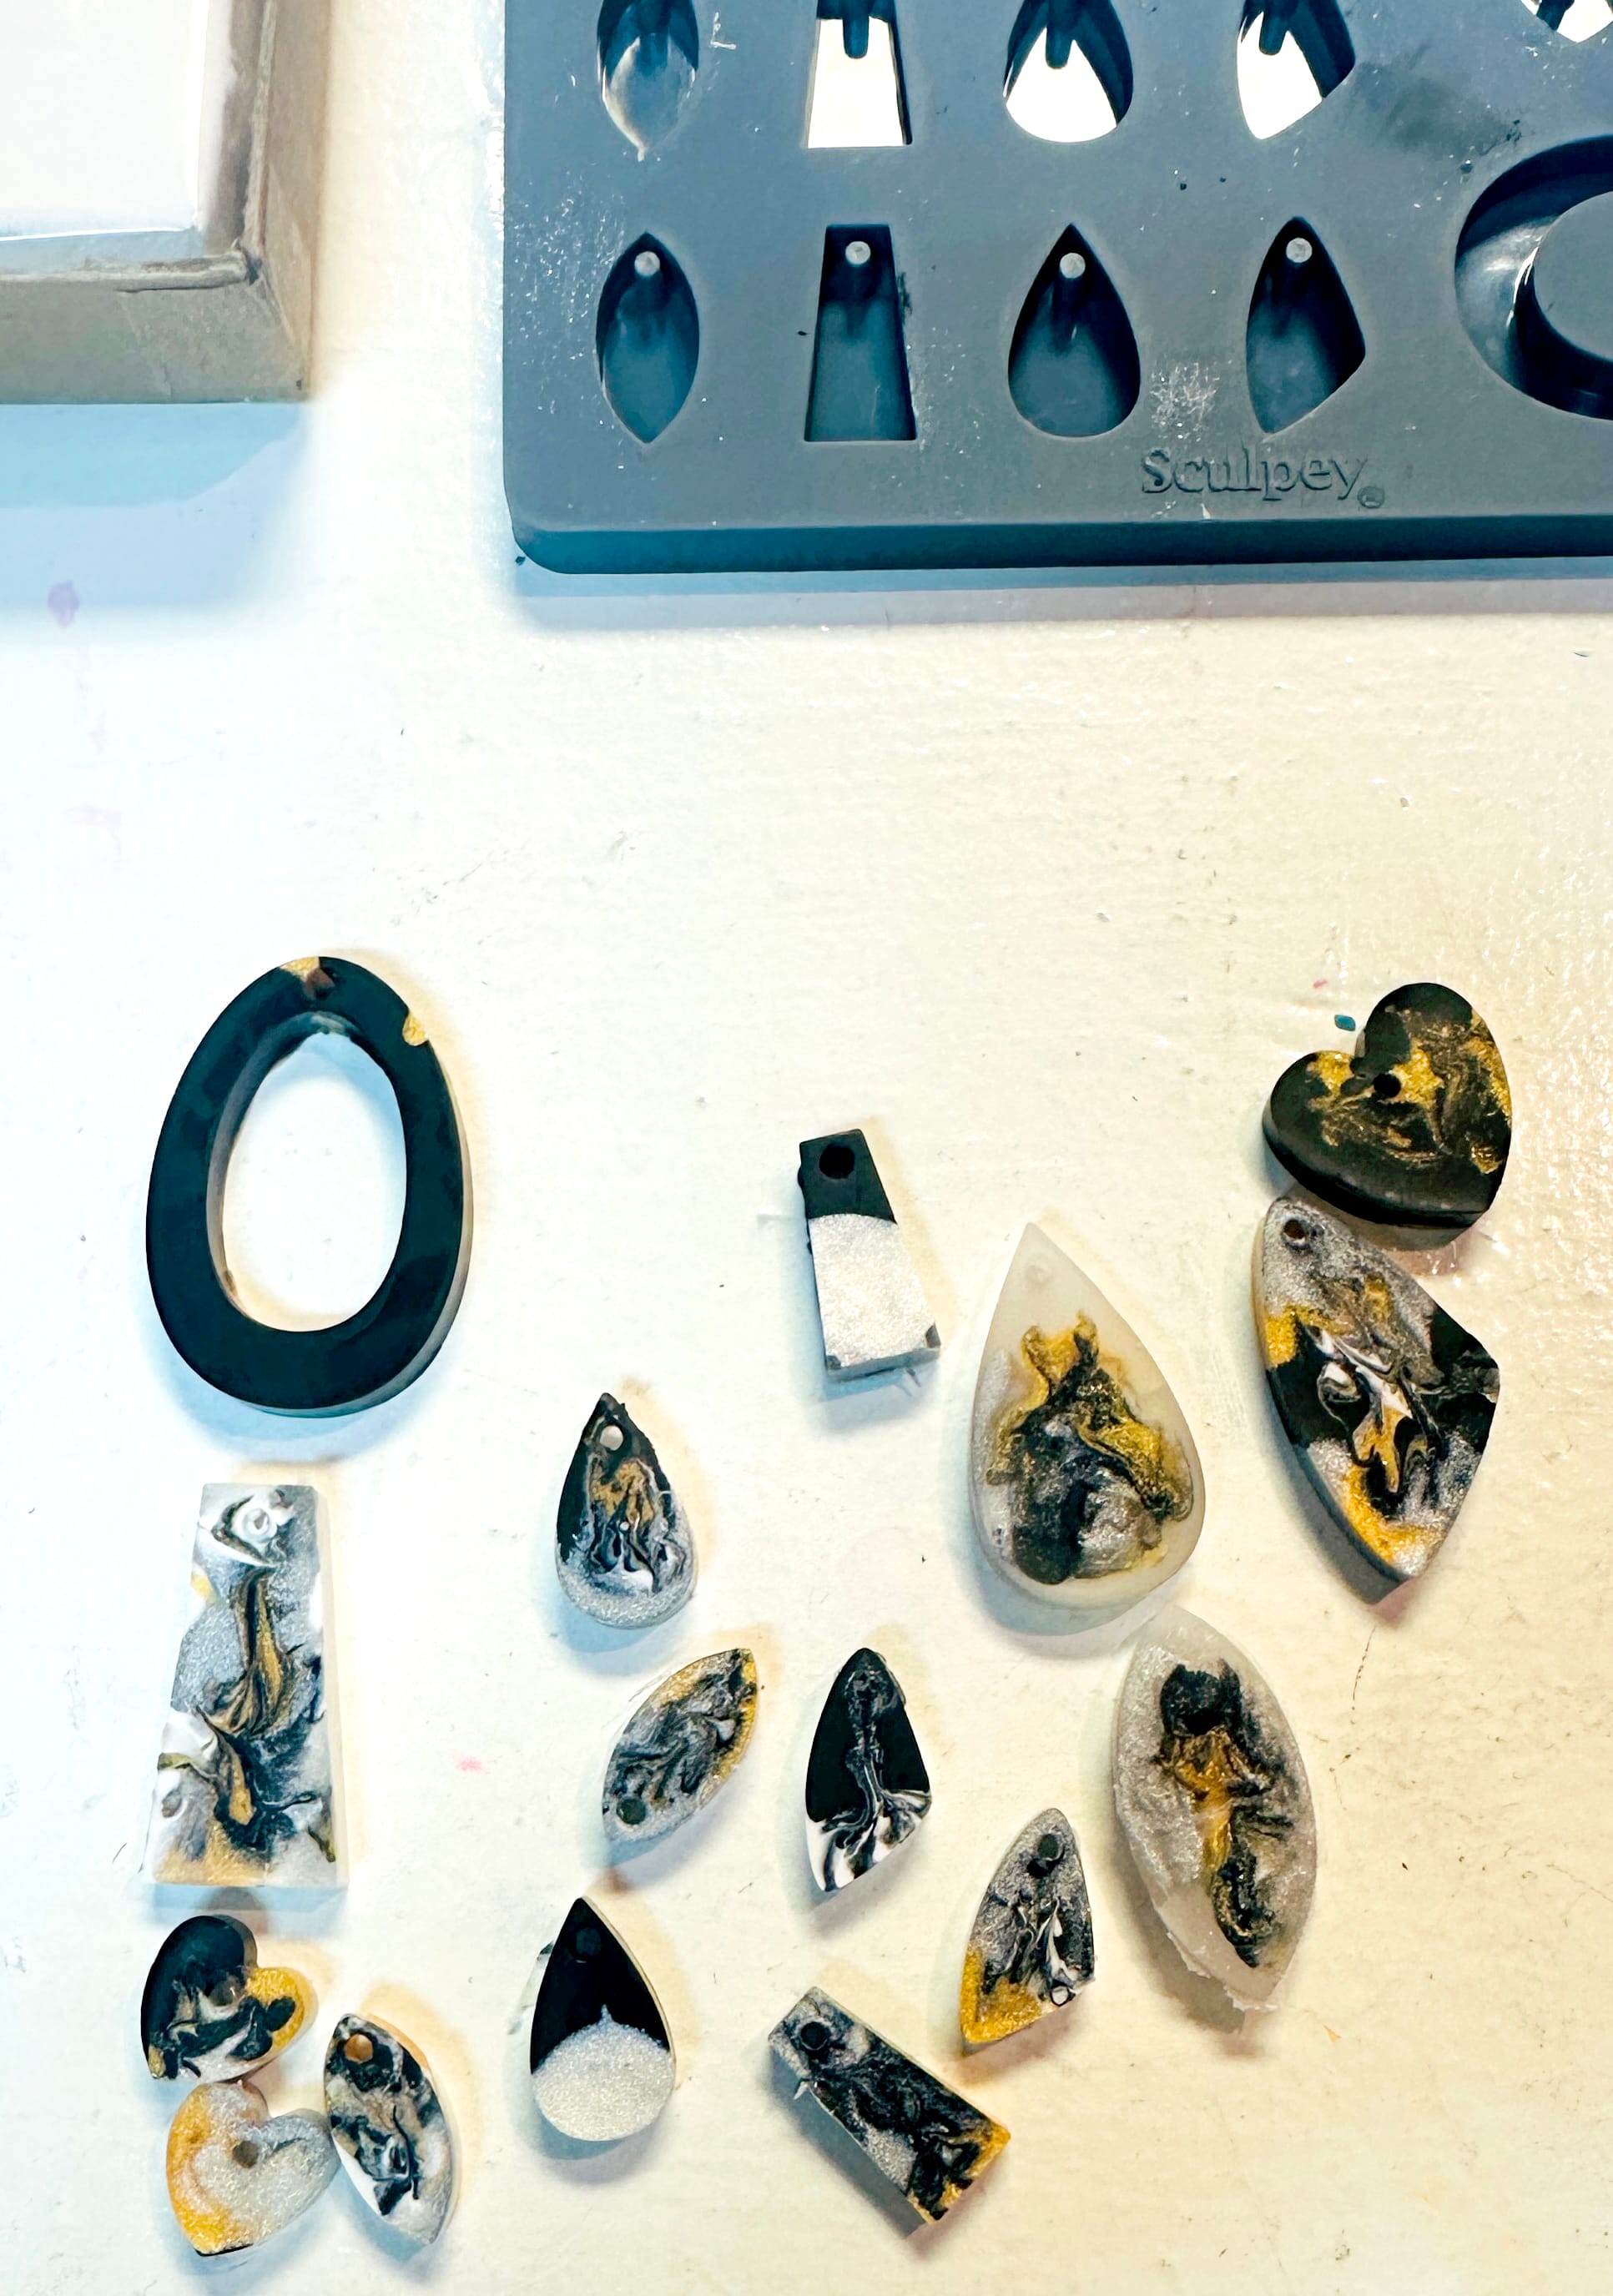
But once the first batch was baked and removed from the molds, I could see both sides—and some of the backs were considerably less exciting than the fronts.
They weren't necessarily bad. They were just...boring.
The colors hadn't moved through the entire depth of the Liquid Sculpey in the same way I'd manipulated the visible surface.
So when I made the second batch, I changed what I was doing.
Instead of thinking only about creating an interesting surface, I became more conscious of how the different colors were being added and moved throughout the mold.
I experimented more intentionally with getting color and movement into areas that would eventually become the back.
And already, the results became more interesting.
That might sound like a tiny discovery, but it's exactly the kind of thing I find fascinating about experimenting with an unfamiliar material.
The first batch taught me how to make the second batch.
I didn't need someone to tell me I'd done the first one "wrong."
I needed to see what happened, turn the pieces over, notice something I wanted to change, and try again.
Into the Oven
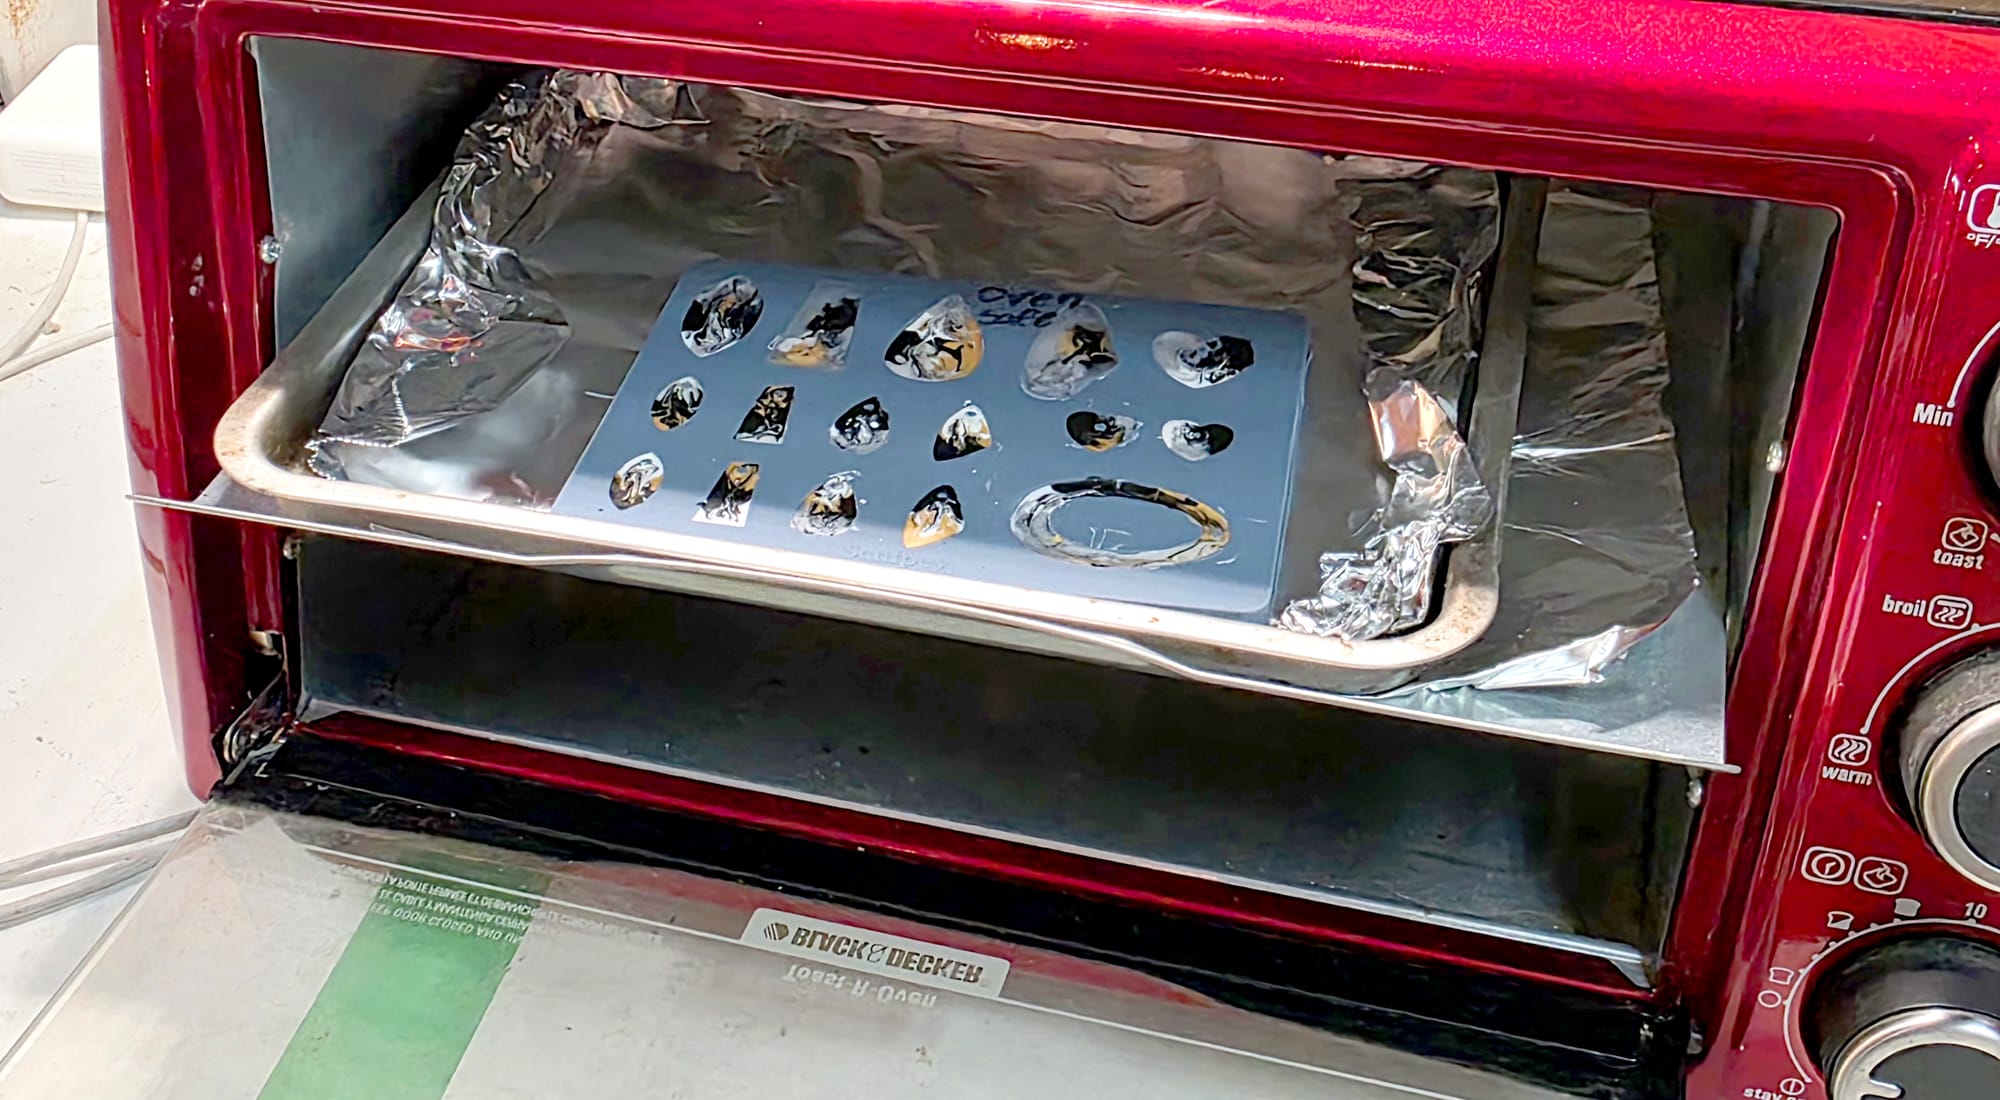
Once we'd finished filling and swirling the molds, the entire silicone mold could go into the oven.
That was another part of the process I found interesting.
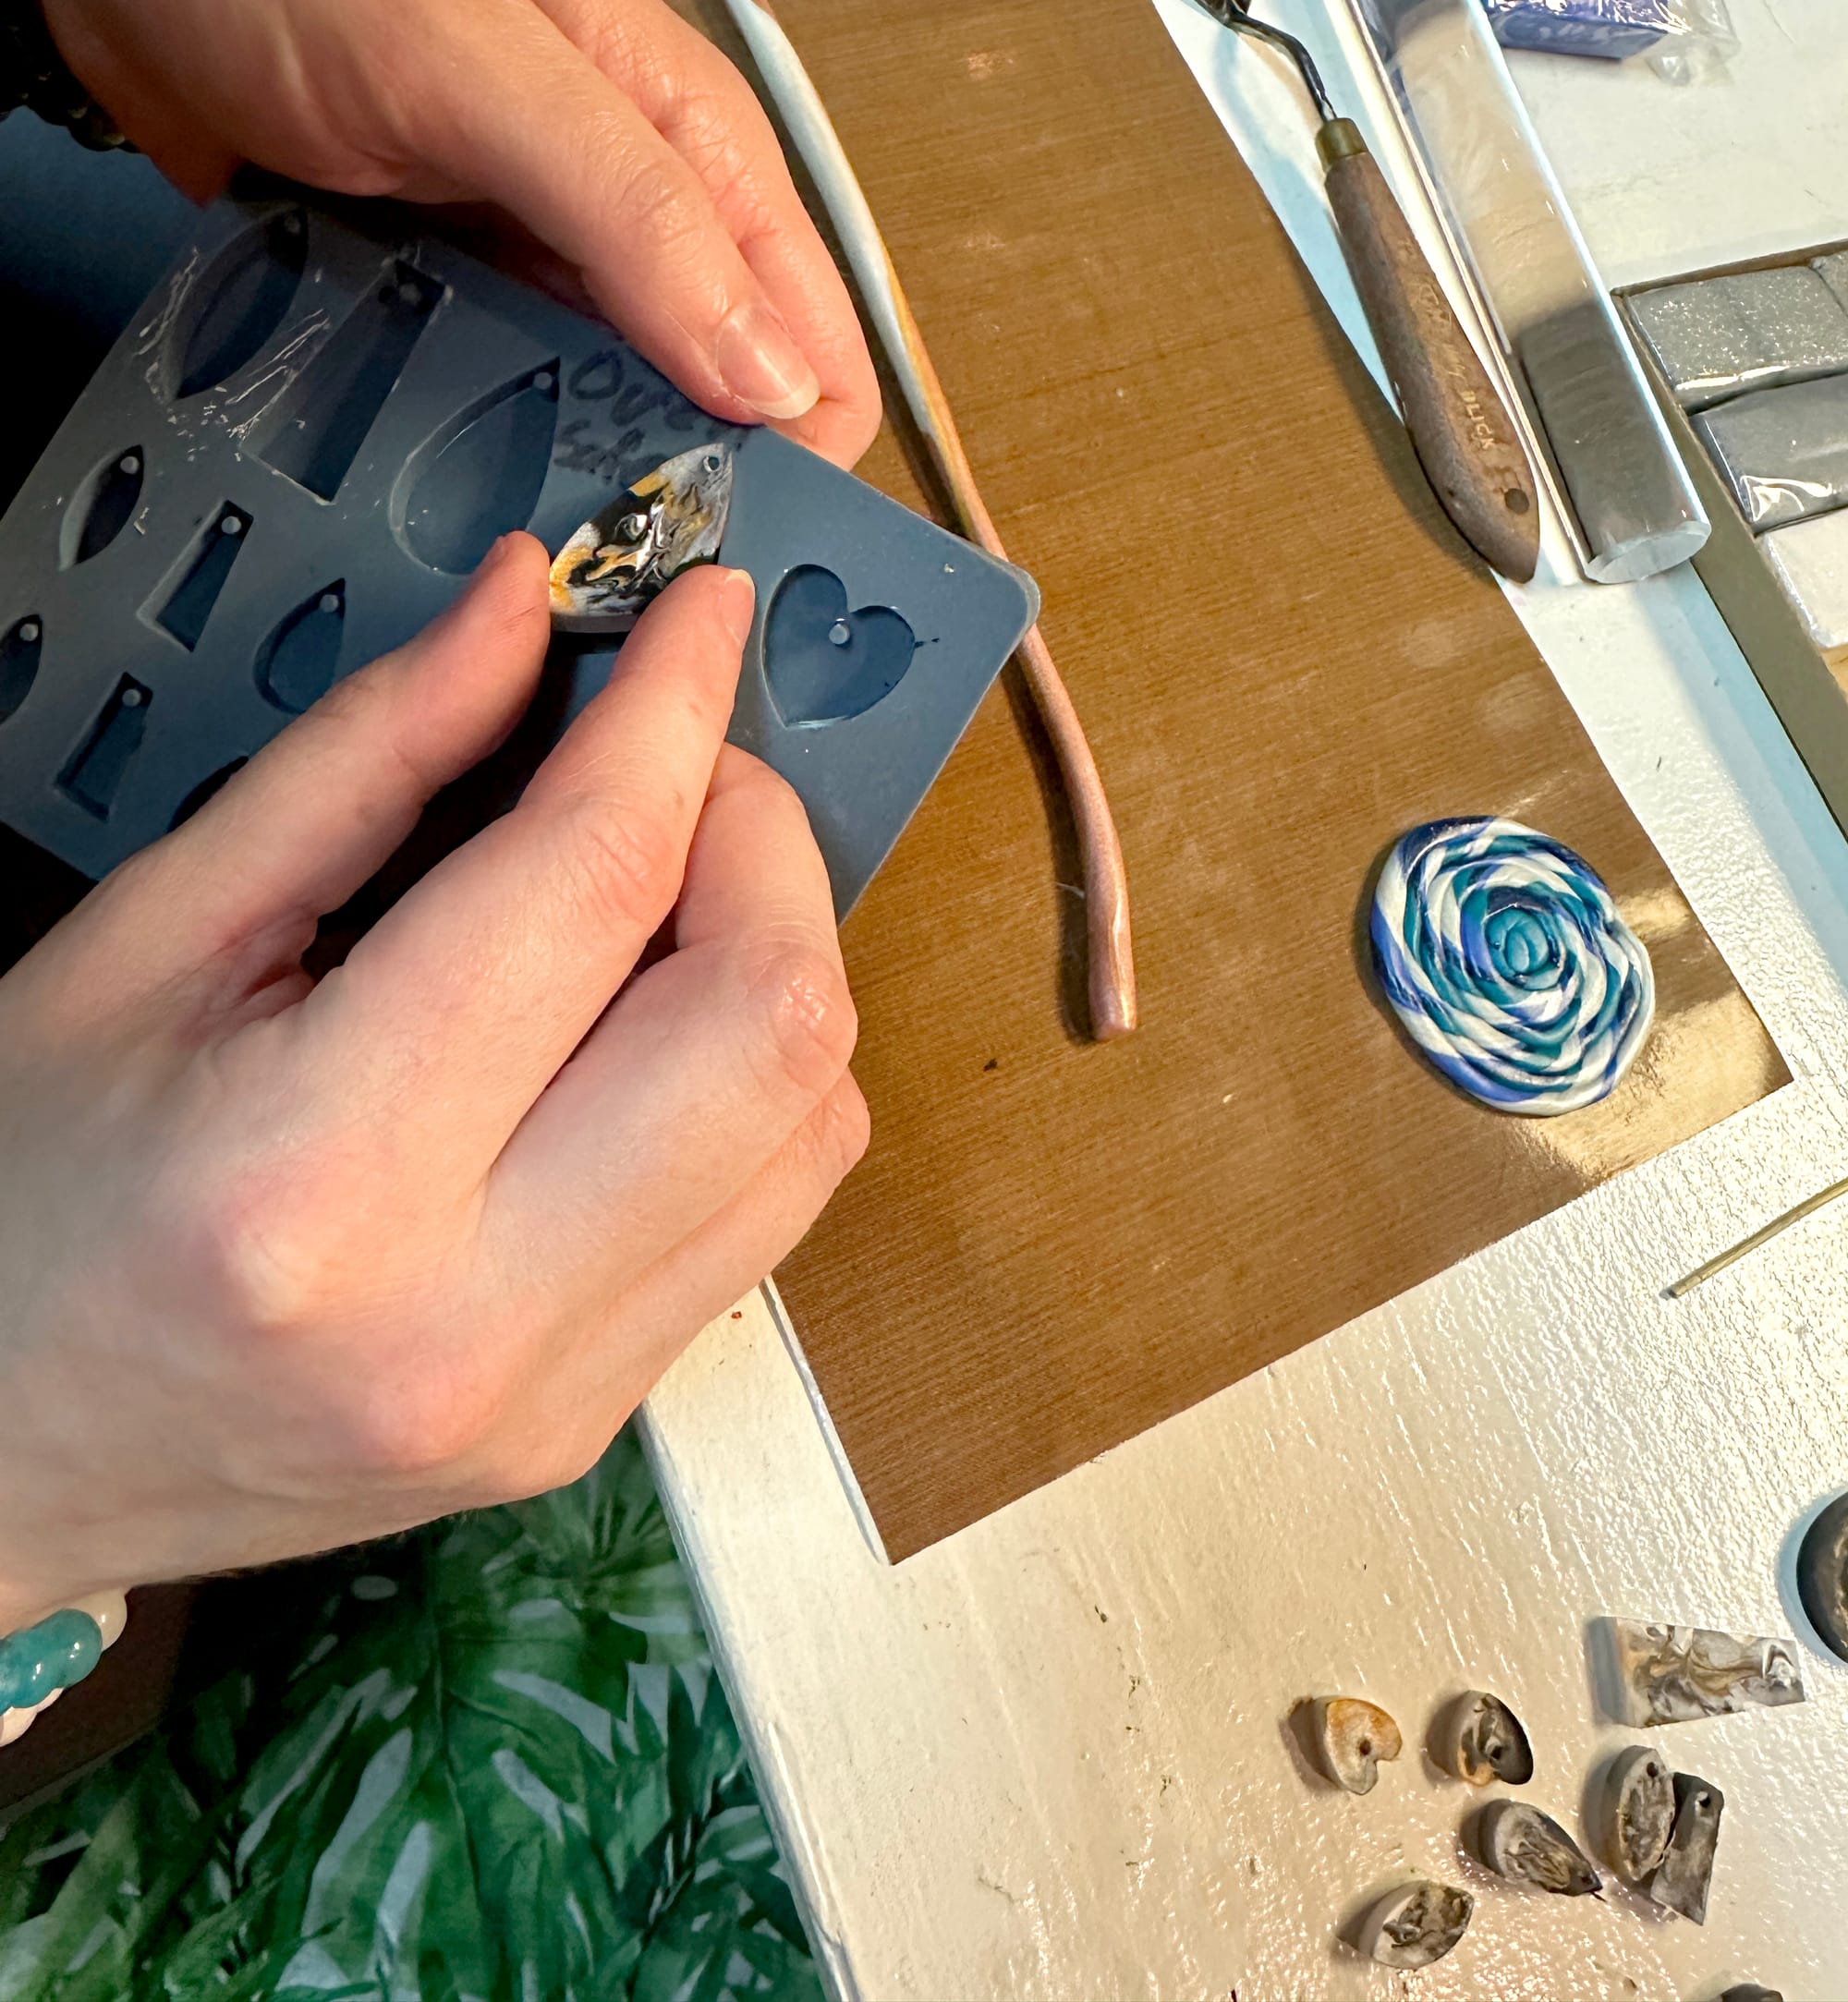
Instead of trying to remove a delicate liquid-filled shape before curing it, Liquid Sculpey can be baked directly inside an appropriate oven-safe silicone mold and removed after it has cured and cooled.
Sculpey recommends allowing the pieces to cool completely before gently flexing the mold to release them.
And then came the best part: seeing what we'd actually made.
The fluid swirls had become solid little pendants, earring components, hearts and irregular shapes.
Some looked almost like tiny pieces of marbled stone, while others reminded me of abstract paintings captured inside jewelry.
None of them were exactly alike.
And after one evening of experimentation, I already had new questions:
- What happens if I swirl the colors less?
- What if I layer them instead?
- Can I intentionally create interesting patterns on both sides?
- How much Liquid Sculpey actually fills each mold without overflowing?
- What happens with different ratios of metallic and basic colors?
- Can I make two pieces similar enough to become matching earrings without making them completely identical?
Those are experiments for the next batch.
Experiment #2: Twisting, Marbling & Coiling Polymer Clay
After experimenting with Liquid Sculpey, we moved on to the solid Premo™ and Soufflé™ polymer clay.
This was a completely different experience.
Instead of pouring a material and watching it settle into a mold, suddenly the material was directly in our hands.
We could roll it, stretch it, twist it, flatten it, reshape it and combine colors in ways that were much more immediate.
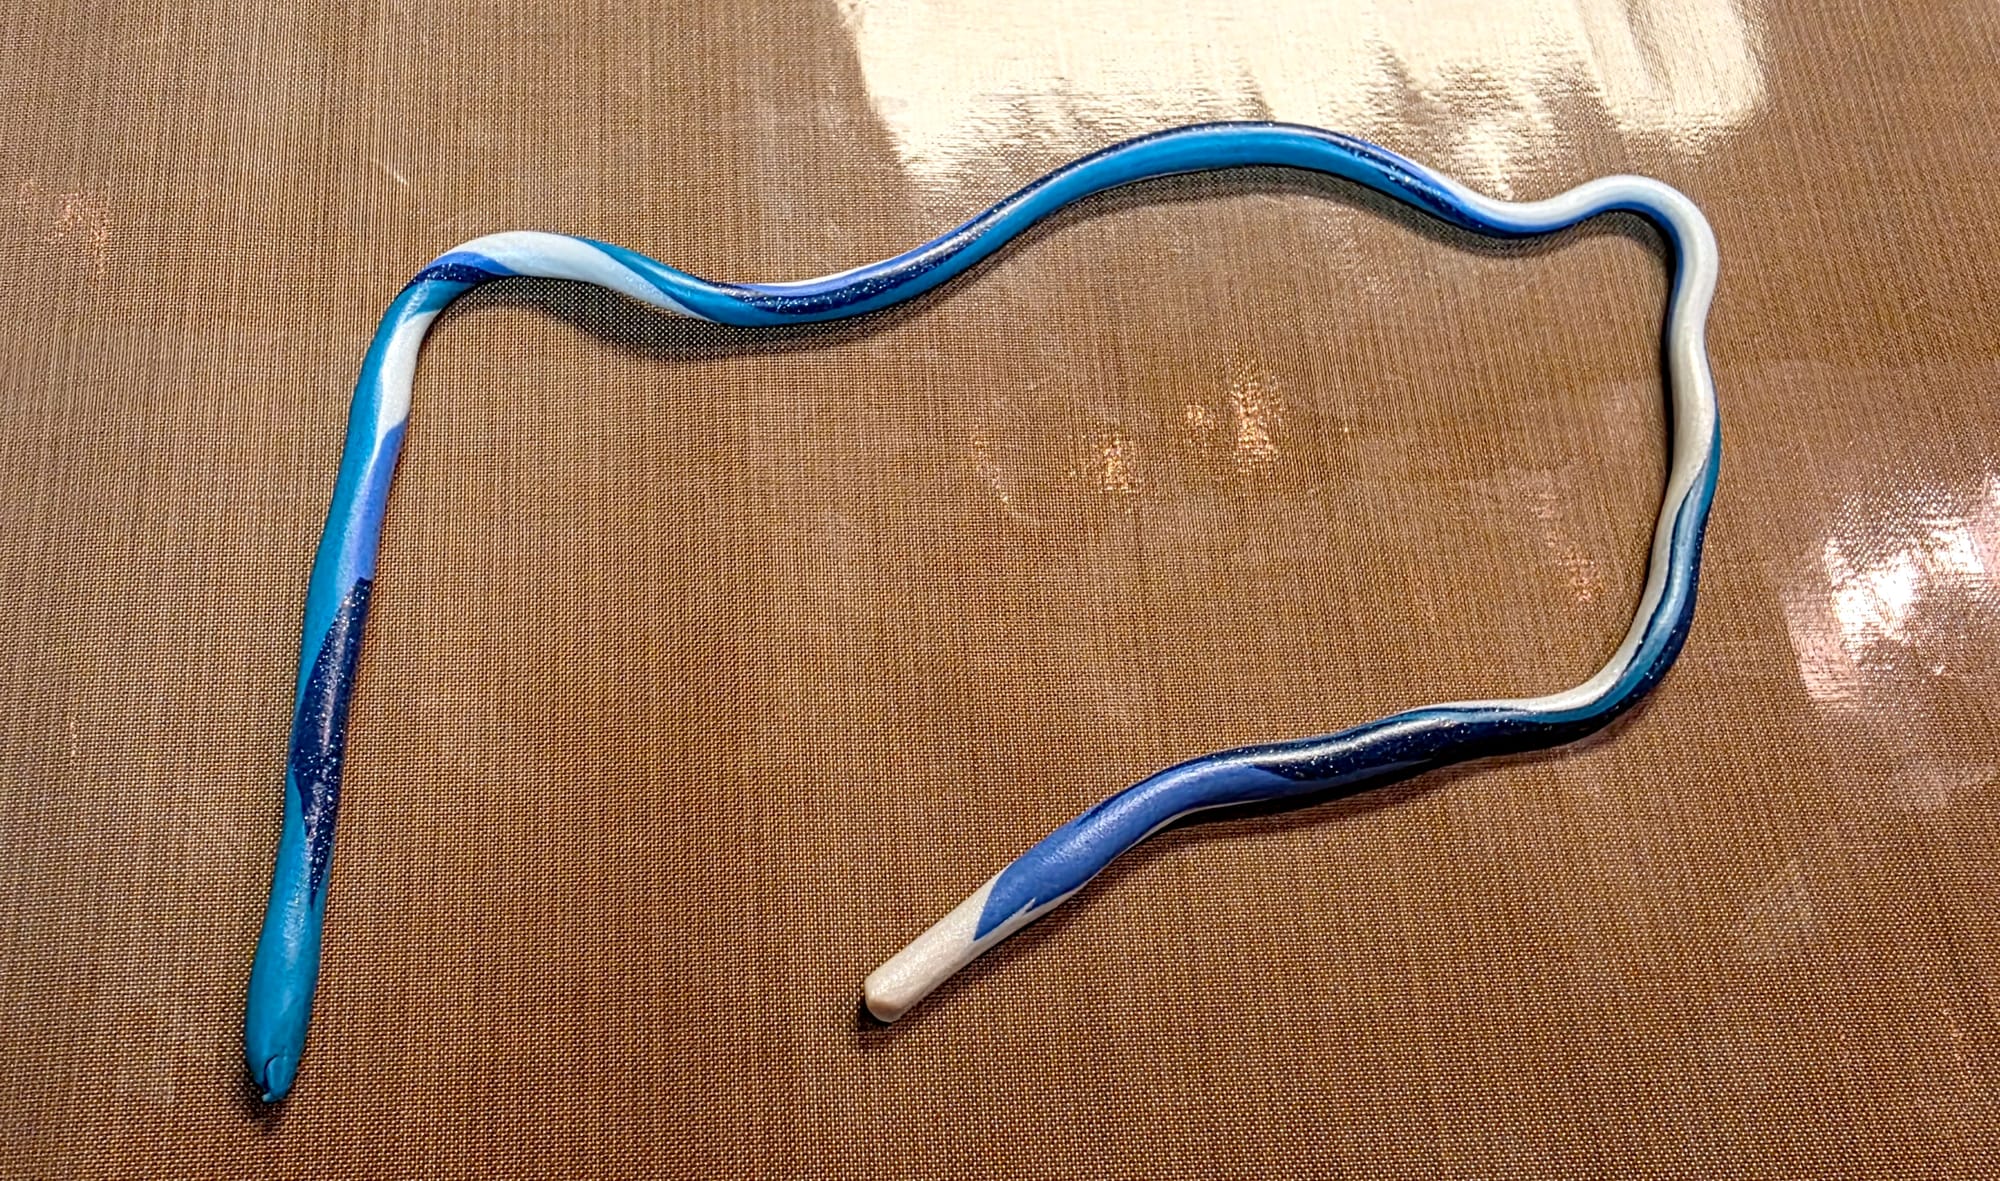
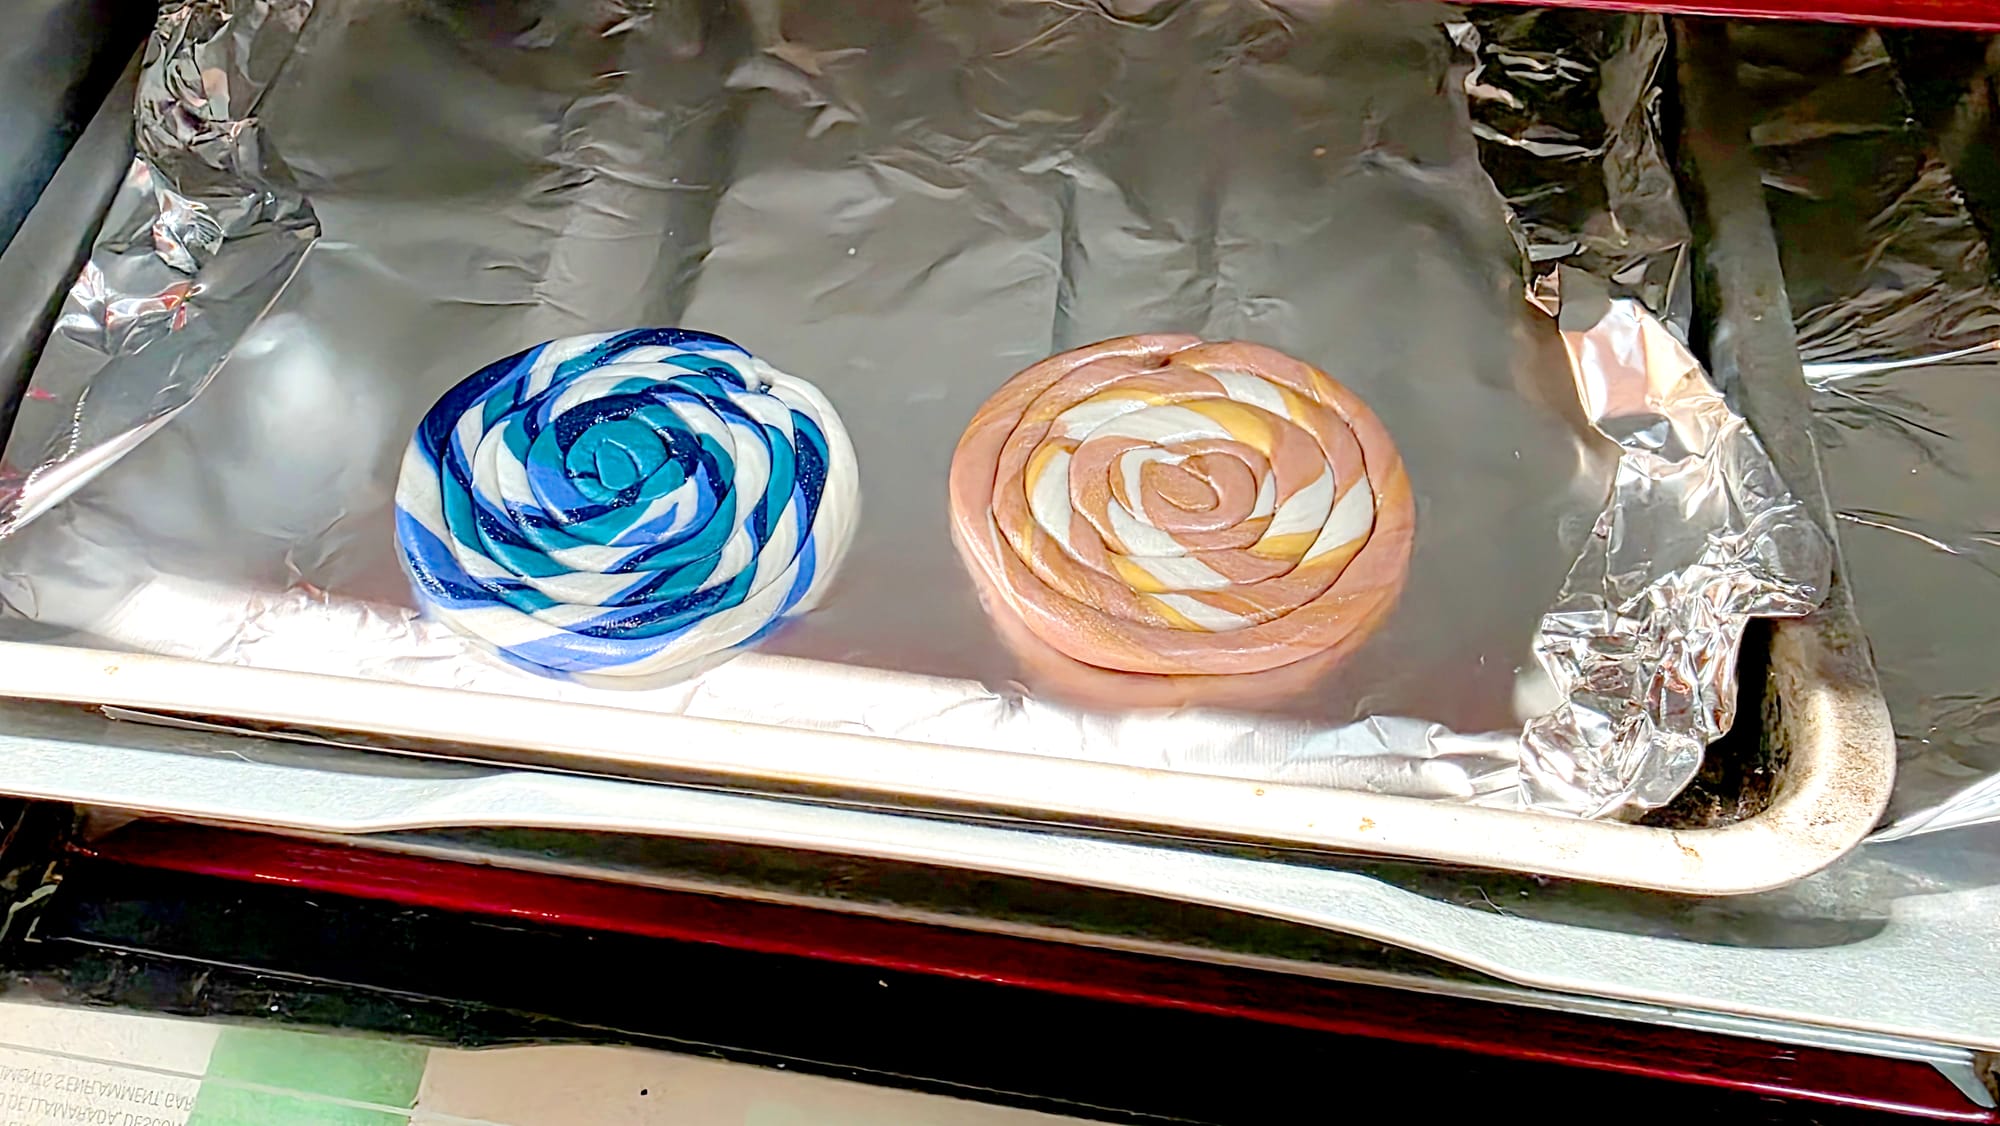
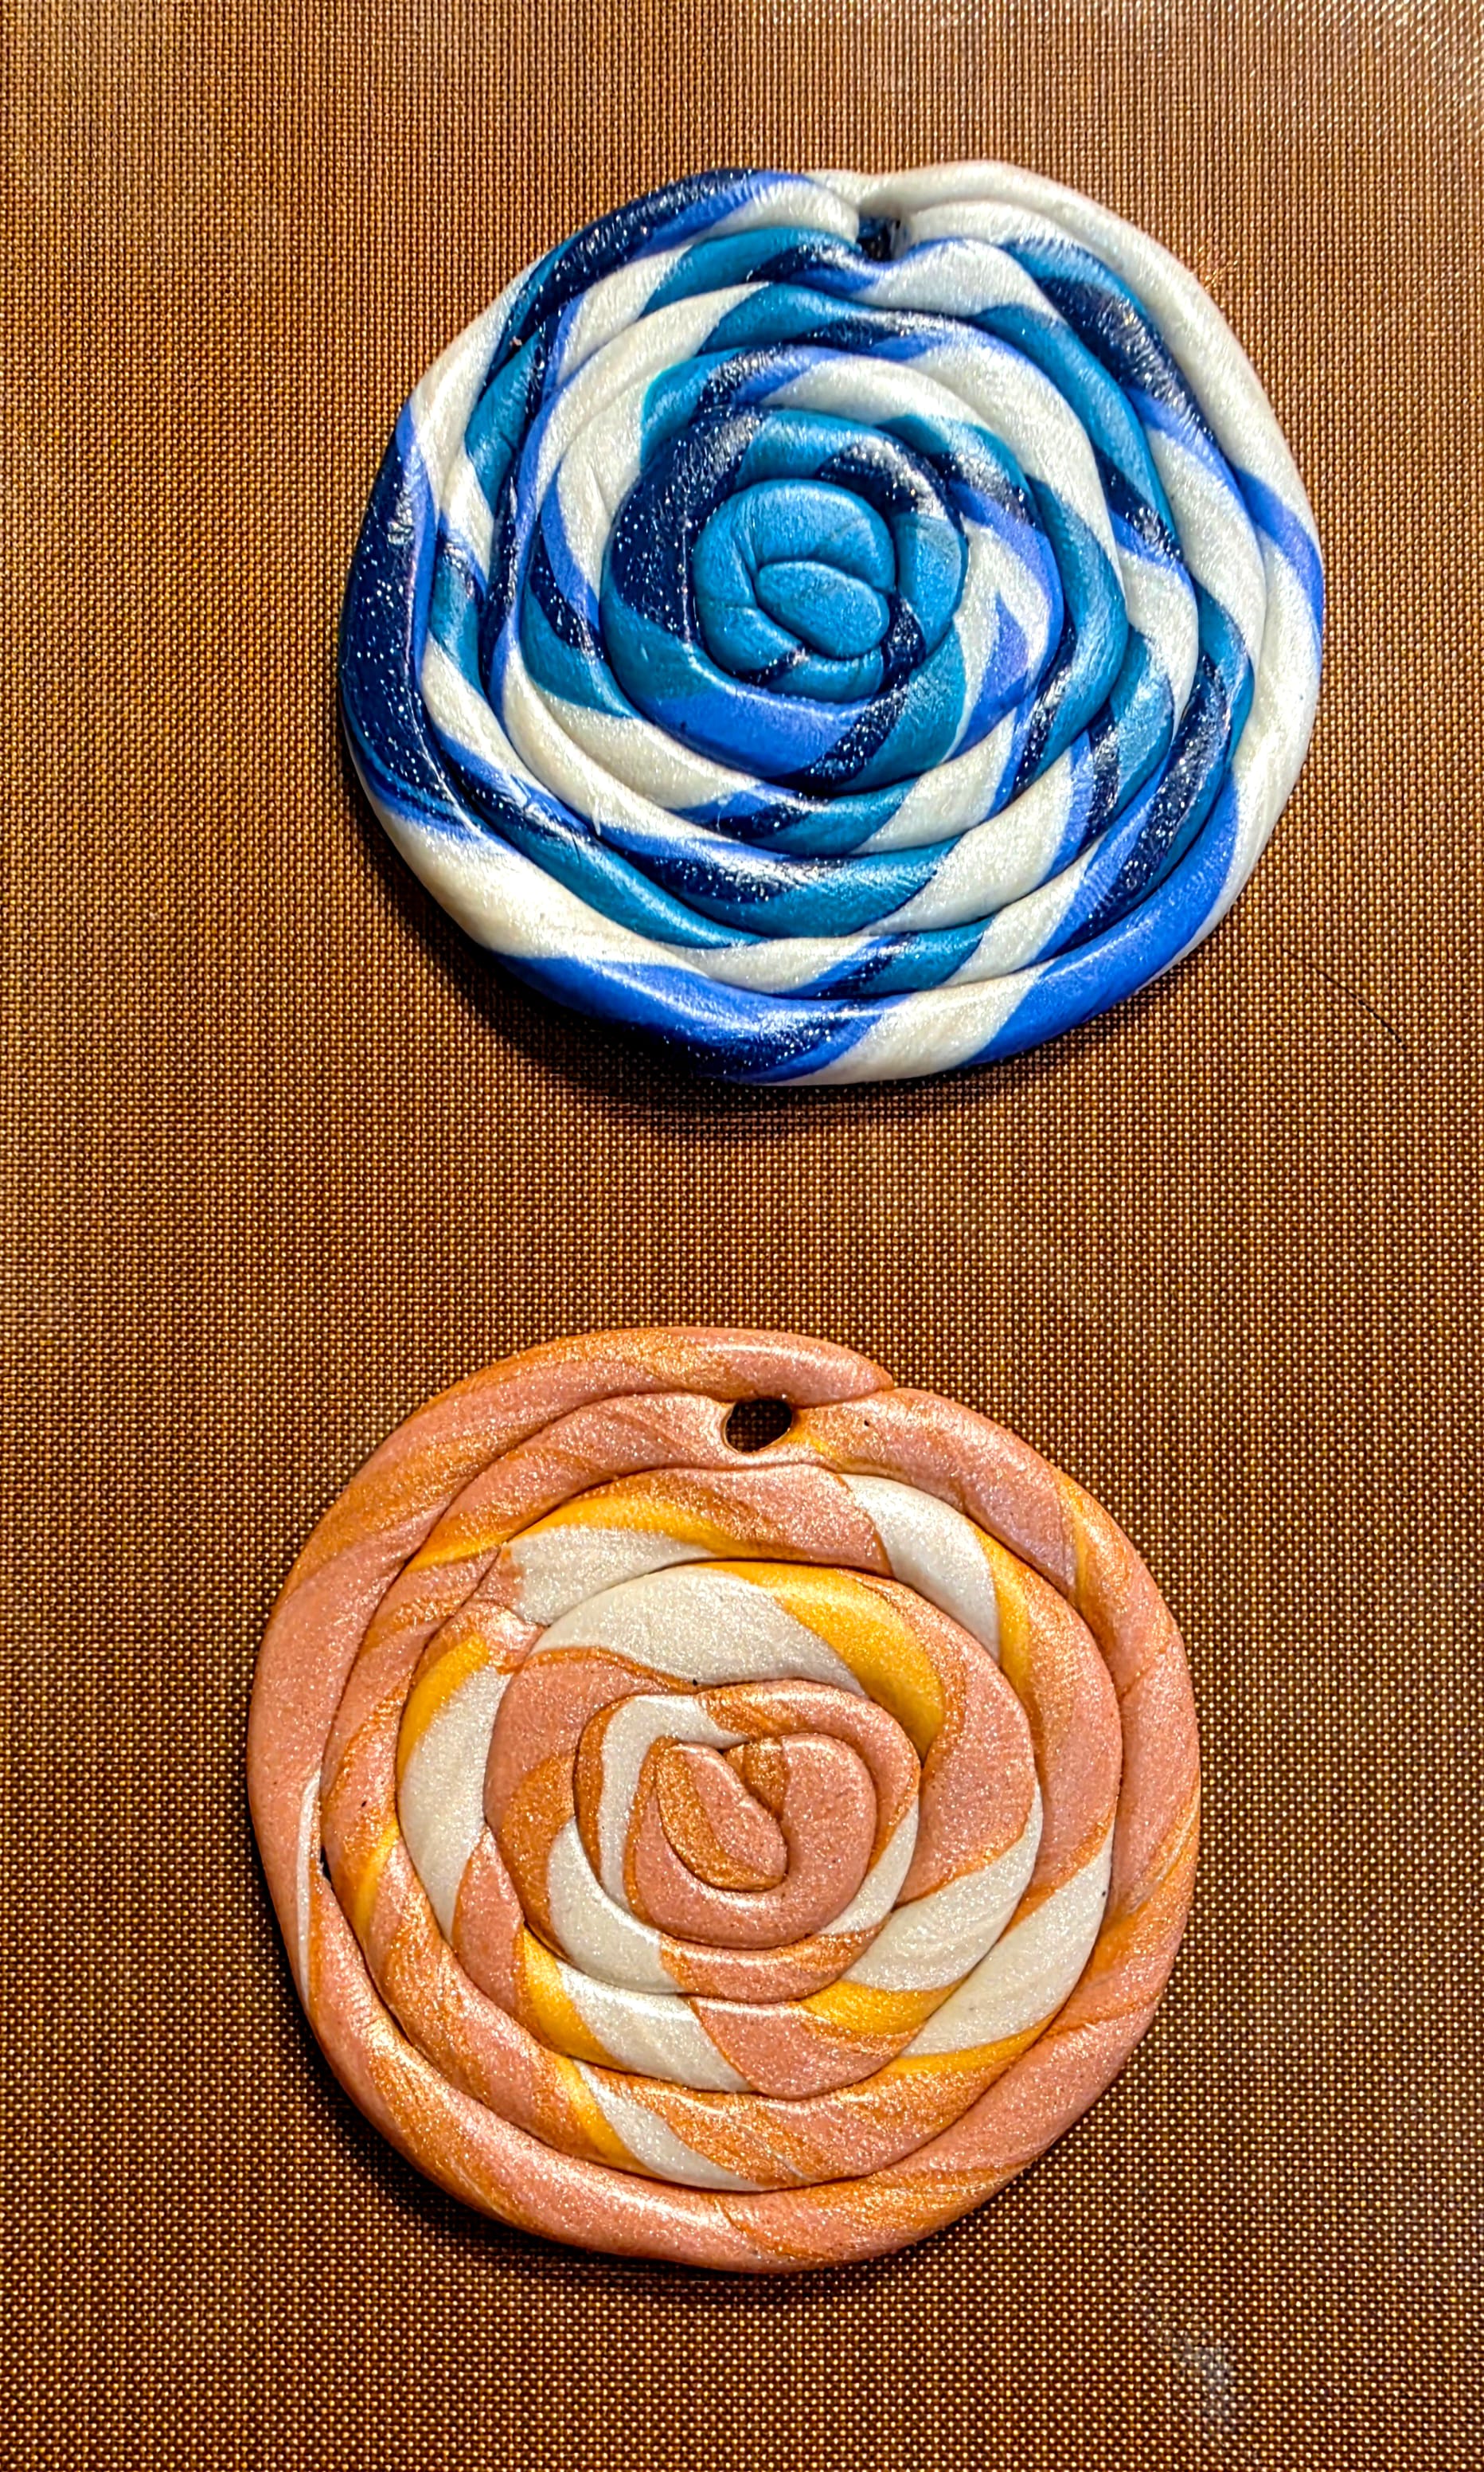
I decided to experiment with several shades of blue and white.
I rolled the individual colors into long, thin strands and placed them together.
Then I began twisting the strands around one another, creating a striped rope of clay.
Even at this stage, I loved watching the pattern change.
The colors weren't really mixed in the traditional sense.
I wasn't kneading blue and white together until I had a new shade of light blue.
Instead, the individual colors remained visible while becoming increasingly intertwined.
Sculpey actually uses a similar process for creating marbled polymer clay: different colors can be rolled into strands, bundled together, twisted, rolled and folded until the desired amount of marbling develops.
The important part is knowing when to stop—continue mixing long enough and those beautiful individual streaks eventually begin blending into a new, muddier color.
That made me curious about something surprisingly simple: how much can you mix colors without actually mixing them?
From a Twist to a Spiral
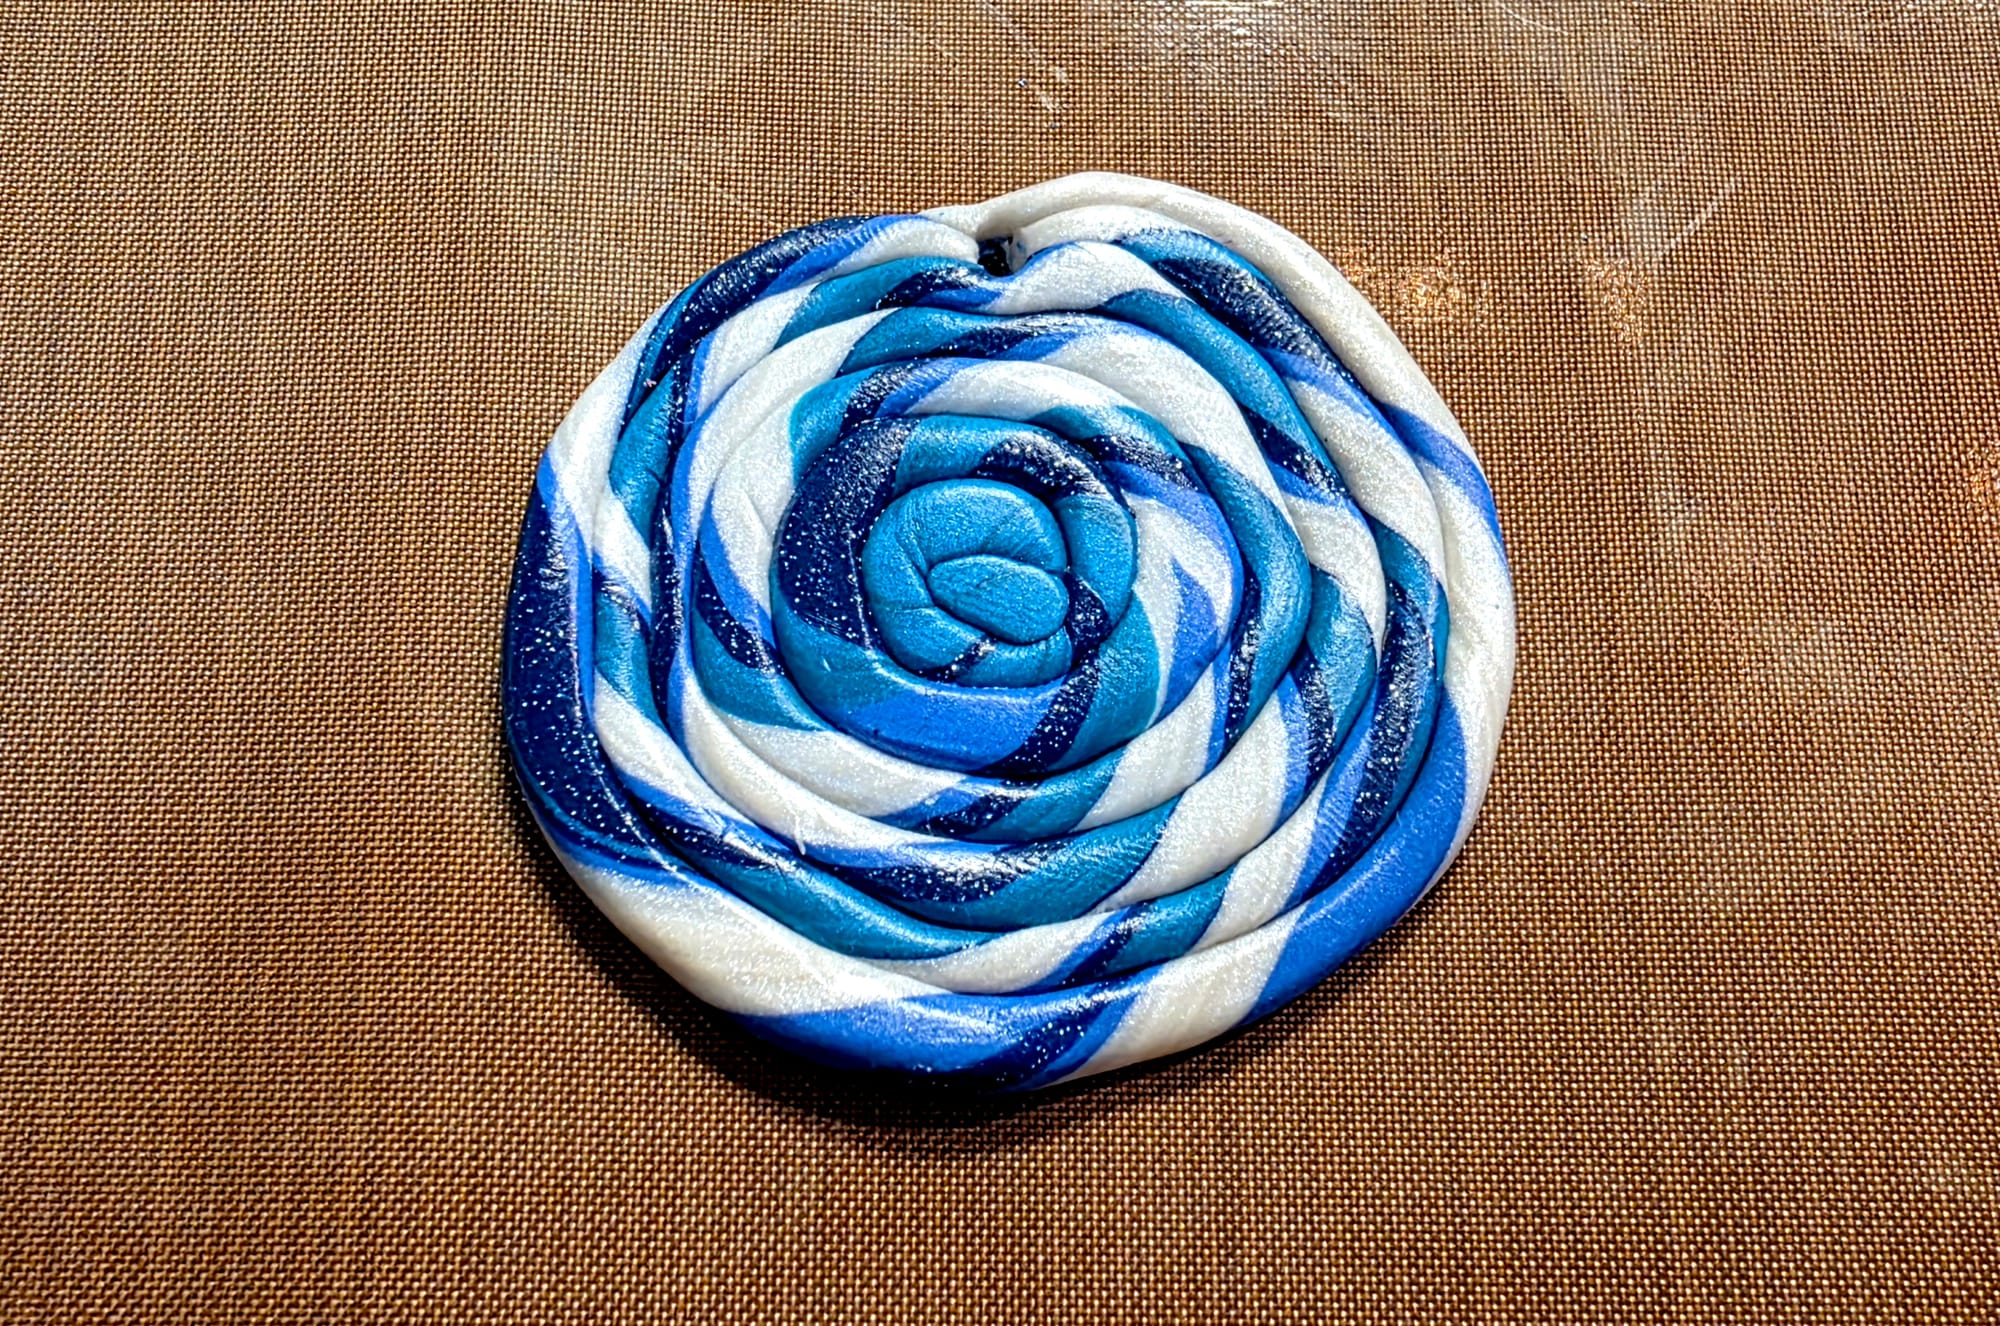
Once I had created the twisted strand, I started coiling it inward on itself.
The long rope gradually became a flat spiral, with the blues and white wrapping around one another almost like a tiny galaxy, whirlpool or piece of striped stone.
Interestingly, this wasn't something completely outside established polymer-clay techniques, either.
Sculpey uses twisting and coiling in several of its own marbling projects; the more the clay is folded, rolled and twisted, the more numerous the stripes become and the more the colors begin to blend.
But I wasn't trying to replicate a particular pattern.
I was mostly playing.
And I think that's an important distinction.
I wasn't asking: how do I make the perfect polymer clay spiral?
I was asking: what happens if I do this?
So I twisted.
I rolled.
I coiled.
I looked at what happened and decided whether I wanted to keep manipulating it or leave it alone.
Knowing When to Stop
That last part may actually be one of the trickiest things about marbling.
Every time I manipulated the clay, the pattern changed.
Another twist could make it more interesting—or begin erasing the contrast I liked in the first place.
Sculpey's own guidance cautions against overworking marbled clay for exactly this reason: if you continue manipulating it, eventually the distinct colors can blend together rather than remaining as visible swirls and streaks.
That means there isn't necessarily one objectively "correct" stopping point.
It depends on what you're trying to create:
- Do I want bold stripes?
- Fine veins of color?
- A soft marble?
- Colors that almost—but don't quite—blend together?
For this first experiment, I liked being able to see where the individual blues and white traveled through the spiral.
There was something satisfying about looking at the finished form and still being able to trace pieces of the original strands.
And, just like the Liquid Sculpey experiments, it immediately made me wonder what would happen if I changed the variables:
- What if I use two colors instead of several?
- What if I combine dramatically contrasting colors?
- What happens with metallic or glitter clay?
- What if the strands are different thicknesses?
- What happens if I twist them much more—or barely twist them at all?
- What if I flatten the spiral afterward?
- What if I cut through a thick marbled piece and see what patterns are hiding inside?
One simple twist suddenly contains a surprising number of possible experiments.
And that's before I've even really started sculpting.
What I’m Learning So Far
After only one evening with these materials, I definitely don't feel like I've figured out polymer clay.
If anything, I have more questions than when I started.
But I am beginning to understand something that is difficult to learn simply by reading instructions: how the material actually behaves in my hands.
The Liquid Sculpey taught me to pay attention to quantity.
A mold cavity that looks like it needs just a little more can very quickly become an overfilled mold.
It taught me to think about both sides of a piece rather than concentrating exclusively on the surface I can see while I'm working.
And it taught me that the first attempt doesn't have to be the best attempt.
By the time I made my second batch of molded pieces, I was already approaching them differently because I'd seen the results of the first.
I became more intentional about where I placed colors and how I created the marbling so that the backs could be interesting, too.
The solid polymer clay presented an entirely different set of possibilities.
Instead of controlling how a liquid flowed, I could directly control the material—rolling it, twisting it, coiling it and deciding how far I wanted colors to intermingle before stopping.
The materials behaved differently, but the process of learning them was remarkably similar: try something. Look at what happened. Change something. Try again.
Imperfect Doesn't Mean Unusable
Some of my Liquid Sculpey pieces have extra material around their edges where I overfilled the molds.
My first thought wasn't that I needed to throw them away.
It was: can I fix that?
That's now another experiment.
Cured polymer clay can be sanded and buffed, and compatible finishes can also change its final surface.
So rather than treating the imperfect pieces as failures, I'm going to use them to experiment with finishing techniques.
Can I remove the overflow cleanly? Smooth the edges? Bring out more of the metallic shine?
I'll find out.
After all, that's what this lab is for.
I'm Also Learning From Other People
Perhaps my favorite discovery so far has nothing to do with a particular clay technique.
It's how much faster ideas multiply when creative people start making alongside one another.
Someone knew about polymer clay jewelry.
Someone had molds.
Someone knew something about Liquid Sculpey.
Someone suggested something else we could try.
Then one person's experiment made someone else curious.
By the end of the evening, we weren't simply following instructions for what polymer clay is supposed to do.
We were asking one another: what if we tried this?
That's a question I want to keep asking throughout this experiment.
Because after one art-club session, I haven't come remotely close to exhausting the possibilities.
I've barely opened the box.
 Jessica Carey
What Else Can It Do?
Jewelry was an easy place to begin.
The molds we used at art club were designed for jewelry components, and polymer clay lends itself beautifully to beads, pendants, earrings and charms.
But the more I worked with the Sculpey, the less interested I became in stopping there.
After all, this is The Materials Lab.
The question isn't only: what can I make with this?
It's: what else can it do?
Polymer clay has an enormous range of possibilities.
Sculpey itself suggests its artist clays for everything from jewelry and figurines to sculpture, faux stones, mixed media and home décor.
Premo and Soufflé can both hold fine details, which makes them particularly interesting for smaller sculptural work.
And I have barely begun exploring any of that.
Next Experiment: From Jewelry to Sculpture
Since I'll have a little time before our next art club, I want to try something completely different on my own: a small dog sculpture.
The person I'm making it for loves dogs, and a lot of the artwork around her home incorporates things like blue, outer space and rainbows.
Rather than trying to make a completely realistic dog, I'm imagining something much more whimsical—a little blue dog holding a shooting star, perhaps with a rainbow trailing from the star behind it.
I have absolutely no idea yet whether what I'm picturing in my head will translate successfully into clay.
Which is precisely why I want to try it.
This experiment will ask completely different things of the material.
Instead of pouring Liquid Sculpey into a mold or rolling clay into strands, I'll have to figure out how to build a three-dimensional form: a body, head, legs, ears and all those little details that make something actually read as a dog.
I'll also get to experiment with combining colors intentionally rather than primarily marbling them.
- Can I create the little character I'm imagining?
- Will the clay hold the shapes and details I want?
- How easy will it be to attach smaller pieces?
- Will I need some kind of internal or external support for any of the thinner parts?
And perhaps most importantly: what will I learn when something inevitably doesn't work the way I pictured it?
Sculpey recommends supports or armatures for larger sculptures and for unsupported parts that carry weight, because polymer clay softens somewhat during baking before it cures.
Wire and aluminum foil are among the materials that can be used for support.
My little dog may be small enough that I don't need much of that, but it's something I'll be paying attention to—especially if I give it extended legs, ears, a tail, or a shooting star that needs support.
 Jessica Carey
So Many Directions to Go
The dog is only one idea.
Looking at these materials now, I can imagine experiments with:
- tiny sculptures and characters
- beads and jewelry components
- miniature objects
- textured or stamped clay
- ornaments and hanging pieces
- faux stone and other material effects
- small tiles or mosaic-like pieces
- mixed-media artwork
- clay combined with wire
- dimensional embellishments
- functional objects and décor
- experiments combining Liquid Sculpey with solid polymer clay
Sculpey even demonstrates projects combining Premo and Liquid Sculpey in the same piece, as well as polymer clay with metal and other mixed-media components.
And that makes me especially curious about eventually bringing materials from different Materials Lab experiments together:
- What happens when polymer clay meets salvaged wire?
- Scrap mat board?
- Beads?
- Found objects?
- Other materials that weren't necessarily intended to live beside polymer clay?
Not every combination will work—and some materials won't be safe or compatible with the temperatures needed to cure polymer clay, so those experiments will require some research before anything goes into an oven.
But creatively?
The possibilities feel enormous.
And right now, that's much more exciting to me than knowing exactly what I'm going to make.
 Jessica Carey
 Jessica Carey
 Jessica Carey
What Didn’t Go According to Plan?
Of course, experimentation wouldn't be experimentation if everything worked perfectly the first time.
And it definitely didn't.
A Little Too Much Liquid Sculpey
The most obvious issue was overflow.
I genuinely tried not to overfill the molds, but some of those cavities needed a bit less Liquid Sculpey than I expected.
Once the pieces were cured and removed, several had thin, uneven edges where the liquid had crept beyond the boundaries of the mold.
Fortunately, that doesn't mean they're ruined.
Sculpey recommends removing excess Liquid Sculpey before baking when possible, using a squeegee or similar flexible tool to bring the material level with the mold.
Cured Liquid Sculpey can also be trimmed or sanded afterward, so my slightly messy edges have simply created another experiment: learning how to finish the pieces.
I'm going to try carefully cleaning up some of the excess and smoothing the edges.
Sculpey recommends wet-sanding cured polymer clay for rough areas and then buffing it if you want to restore some sheen.
Next time, though, I'll know that almost full may be considerably closer to full than it looks.
The Case of the Boring Backs
My other surprise was less of a problem and more of an aesthetic discovery.
Some of the fronts looked wonderful.
I had deliberately swirled different colors together, creating little marbled patterns that became especially interesting with the metallic Liquid Sculpey.
Then I turned them over.
Oh... some of the backs were not nearly as exciting.
I'd spent so much time thinking about the pattern I could see while filling the mold that I hadn't really considered what was happening underneath it.
But this is where making multiple batches became useful.
Once I saw what had happened with the first batch, I started approaching the second differently.
I became more intentional about distributing and swirling the colors throughout the mold rather than concentrating all of the visual interest in one area.
And the backs started getting better.
That's an experiment I want to continue.
Maybe I can layer colors differently.
Maybe the amount and depth of swirling matters.
Maybe I can deliberately create two completely different designs on opposite sides of the same piece.
A boring back isn't necessarily a failure.
It's another question.
Finishing Is Apparently Its Own Experiment
I also hadn't given much thought to what happens after polymer clay comes out of the oven.
I'd thought mostly about making and baking.
Now I'm looking at some of these pieces and wondering:
- Can I make this edge smoother?
- Can I make that surface shinier?
- Can I bring out the metallic effect more?
- What happens if I buff it?
It turns out that finishing polymer clay is practically another branch of experimentation.
Polymer clay doesn't require a finish at all, but Sculpey describes sanding, buffing and compatible varnishes or glazes as different ways of altering the final surface.
Sanding can remove rough edges, while buffing can create sheen without applying a coating.
So I'm not quite finished with my first pieces just because they're baked.
They've given me another thing to learn.
That's Kind of the Point
I could look at the overflow and think: I messed that up.
I could turn over one of the less-interesting pieces and think: well, that didn't work.
But neither response tells me very much.
It's much more useful—and honestly much more fun—to ask:
- Why did that happen?
- Can I change it?
- What should I try next time?
That's the difference I'm beginning to appreciate between trying to make a perfect finished object and experimenting with a material.
The imperfect pieces aren't interruptions to the experiment.
They're part of the experiment.
The Best Result? Wanting to Keep Going
After all of these experiments, I think my favorite result from the night might be the simplest one: I had so much fun.
I had fun pouring Liquid Sculpey into molds and watching colors swirl together.
I had fun twisting and coiling the solid clay and seeing patterns emerge.
I even enjoyed discovering the things that didn't quite work, because almost every imperfect result gave me another idea for something I could try differently next time.
But I especially loved that I wasn't experimenting alone.
Bringing the Sculpey supplies to art club turned what could have been an individual experiment into something shared.
People gathered around the table. We compared what we knew.
Someone showed us her previous polymer clay jewelry.
Someone had molds she'd never gotten to use with Liquid Sculpey.
Someone discovered a use for Liquid Sculpey she hadn't tried before.
We passed materials around, watched one another work, asked questions, offered ideas and learned together.
By the end of the night, nobody seemed ready for the experiment to be over.
In fact, everyone encouraged me to bring the Sculpey supplies back to another art club so we can keep experimenting and make more jewelry together.
I absolutely plan to.
And in the meantime, I want to keep experimenting on my own.
I already have ideas for a little blue dog sculpture with a shooting star and rainbow, more ways to experiment with marbling, different approaches to Liquid Sculpey molds, finishing techniques to try on the pieces I've already made, and plenty of other possibilities I probably haven't even thought of yet.
That's perhaps what excites me most.
Sculpey didn't send me one project.
They sent me possibilities.
Polymer clay can become jewelry, miniature sculptures, home décor, mixed-media elements, textures, beads, figurines and all sorts of other things—and even Sculpey's own project resources span everything from tiny animals to wall art and functional objects.
But I'm much more interested in discovering those possibilities through making than checking them off a list.
So, this isn't really the conclusion of this Materials Lab; it's a checkpoint.
I'll continue updating this article as I experiment with more of the materials, try new techniques, make more things on my own, and bring the supplies back to art club to see what happens when even more creative minds get their hands on them.
For now, though, I'm incredibly grateful.
I want to give a particularly heartfelt thank-you to Jennifer and Sculpey for making this experiment possible.
Jennifer didn't simply send me a few products to try—she sent an incredibly generous collection of materials that immediately became something I could share with other creative people.
Within one evening, those materials had people gathering around a table, exchanging knowledge, trying unfamiliar techniques, making jewelry, learning from mistakes, and already planning what we wanted to try next.
And those possibilities didn't stop with me.
Thank you again to Jennifer and Sculpey for giving me the materials to explore, experiment, make mistakes, learn, share—and, most importantly, play.
I can't wait to see what we make next.
Want even more content about creativity and art?
Be sure to check out all of our creative chronicles!
If you'd like to see examples of my work, you can find some of my art and creations at Redbubble and Gumroad!
Looking to learn more about resources available in the St. Louis area?
Check out some of these articles:
-Hidden Gems for St. Louis Artists
-Perennial Copper Jewelry Class
-Perennial DIY Watercolors Class
-Perennial Paper Bead Earrings Class
-Leftovers and Upcycle Treasure Box
 Jessica Carey